Stream It. Record It. Keep It.

Replay Music 7 expands on Applian's many years of recording online music. You can record from multiple online sources at the same time without worrying about audio overlap, and your recordings will be tagged with song info, album artwork, and even lyrics.
Launch Replay Music 7, press the Record button, and then visit a high-quality streaming music service. If you are unsure where to go for online music, or if you want to explore new sites, check out the new Guides feature on the left side of the interface.
When music plays, Replay Music 7 will start recording the audio. When the song is over, Replay Music 7 will lookup the song and album information, grab appropriate album artwork, and download the lyrics. It's that simple. Additionally, you can drag & drop your existing music into Replay Music 7 to be "tagged" with song information, album artwork, and lyrics.
IMPORTANT: When recording, be sure to open Replay Music first, THEN open the music player program or browser you're using.
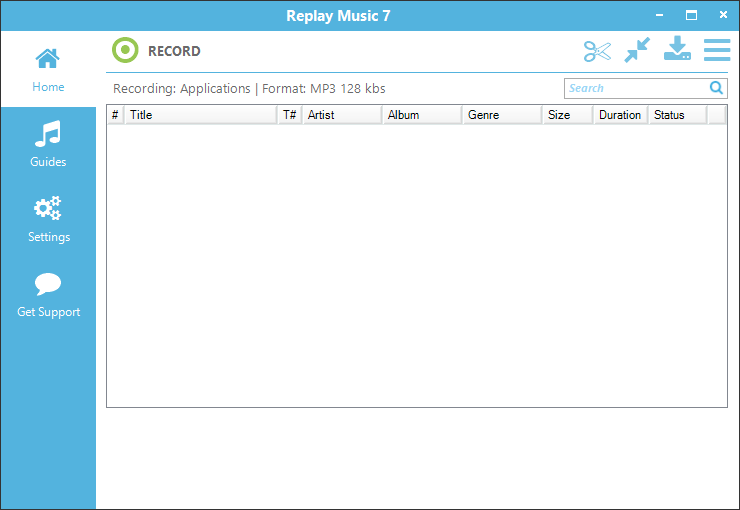
Here's how Replay Music appears when you open it:
To start a recording session:
To ensure Replay Music is recording, look for the VU Meter graph moving rapidly at the bottom left of the main screen. This lets you know that Replay Music can "hear" the audio to record. If you do not see movement in the VU Meter, then Replay Music is not detecting any audio. Stop and restart recording. For best results, open Replay Music PRIOR to starting the application that you will be recording from, and make sure the volume is all the way up in the application you are recording from.
![]()
At the top is the toolbar. From here you can start ![]() and stop
and stop ![]() the recording of media. The buttons at the right are for splitting an active recording
the recording of media. The buttons at the right are for splitting an active recording ![]() , switching to the minimal interface
, switching to the minimal interface ![]() , changing the output folder
, changing the output folder ![]() , and accessing the main menu
, and accessing the main menu![]() . Additionally, if you have not registered your copy of Replay Music 7 yet, you will see the shopping cart button
. Additionally, if you have not registered your copy of Replay Music 7 yet, you will see the shopping cart button ![]() to do so.
to do so.
Along the left side of Replay Music 7 there are tabs for:
The Home screen is broken into three sections.

In the top section below the main toolbar, the active recording method is listed next to Recording:, and Format: displays the sound file type and bitrate being used for the recording. The recording method and format are configurable in Settings, and clicking in this area will take you to the recording settings.
The Search field allows you to locate specific songs that you have recorded - especially useful for very long recording sessions.

In the middle is the listing of recordings. While a recording is active, you will see a new entry appear when audio is detected, and the Size will increment. The Status column will update depending on whether the state is Recording, Tagging, or Complete. The first # column is the order/sequence in which the recording took place, while T# is the tagged track number from album.
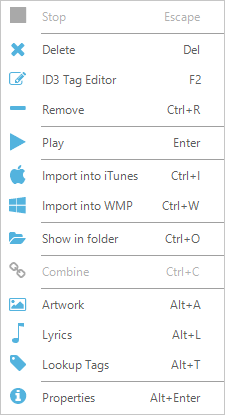
If you right-click on an entry in the recording listing or use the main menu ![]() , you will be presented with more actions:
, you will be presented with more actions:
Stop = Stops the current recording session
Delete = Delete selected recording(s) from computer
ID3 Tag Editor = Open the ID3 Tag Editor for the selected recordings
Remove = Remove file from recording list (This action leaves file in the output folder)
Play = Play selected recording
Import into iTunes = Import selected recording(s) into iTunes library if installed
Import into WMP = Import selected recording(s) into Windows Media Player library
Show in folder = Show selected file in Windows File Explorer
Combine = Combine multiple selected files into a single file
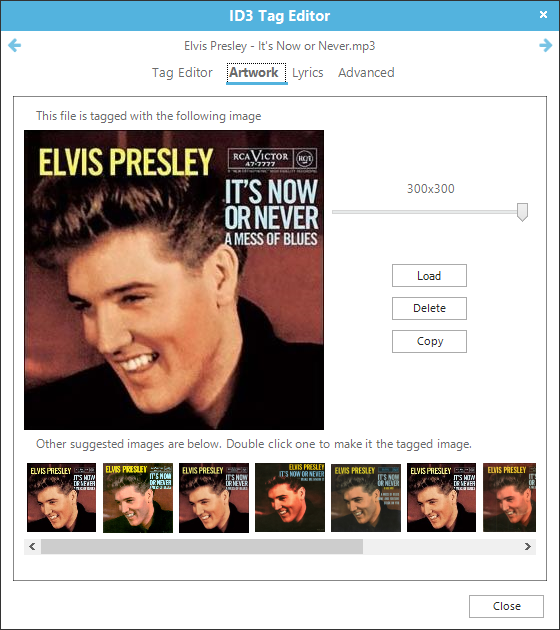
Artwork = Show retrieved album artwork in the Properties Window
Lyrics = Show the song lyrics in the Properties Window
Lookup Tags = Lookup ID3 tags (artist, song, album, etc) for selected song(s)
Properties = Open the recording properties window
Additionally, the Main Menu has options for Importing songs into Replay Music, opening the Help to the support website, and Quitting the program.
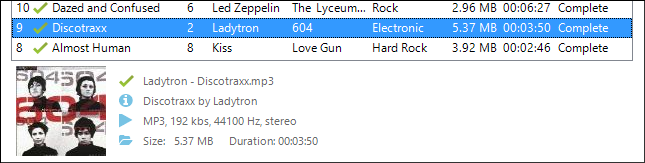
At the bottom is recording information when an item is selected from the recording list. Clicking the ![]() info circle icon will display the detailed recording properties window. Clicking the
info circle icon will display the detailed recording properties window. Clicking the ![]() play triangle icon will launch your media player. Clicking the
play triangle icon will launch your media player. Clicking the ![]() folder icon will open up the location at which the recording was saved on your computer.
folder icon will open up the location at which the recording was saved on your computer.

If you are still in Trial mode (i.e. you have not purchased a license yet), you will see how many credits you have left at the bottom right. While in Trial mode, you can save and tag 25 recordings, after which you will need to purchase a license to keep using the software. Simply click the shopping cart button to begin the registration process.
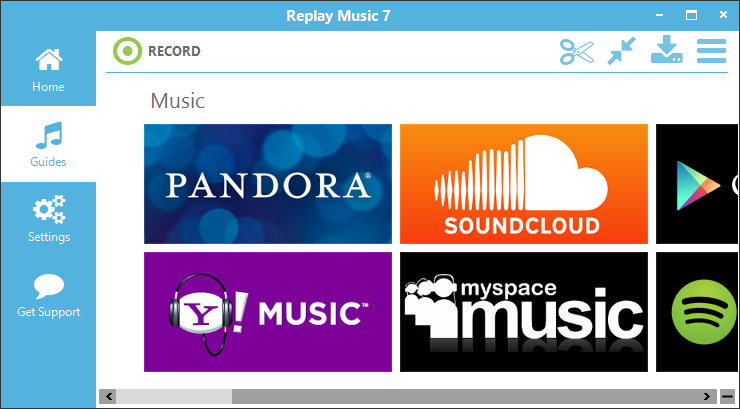
The Guides provides a convenient place to obtain your favorite music and discover new music. Multiple websites for both online music and radio are listed for you to peruse by scrolling left and right. The zoom out button ![]() at the lower right lets you switch between the music and radio guides. You are not limited to these sites as Replay Music 7 will record audio from your browser and other audio applications. Please see Recording Settings below for more information.
at the lower right lets you switch between the music and radio guides. You are not limited to these sites as Replay Music 7 will record audio from your browser and other audio applications. Please see Recording Settings below for more information.

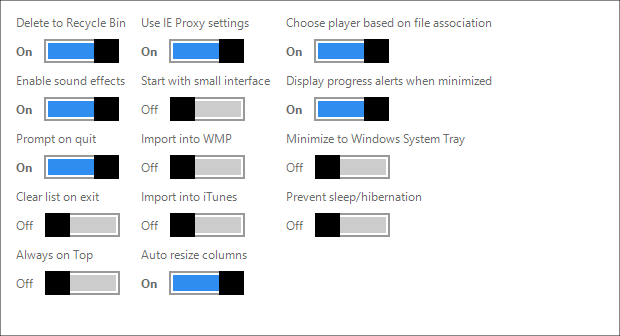
Settings are separated into 5 categories, running just below the Settings header in the main interface. If you want to return to the default settings, as shown below, press the curved arrow icon ![]() at the top right.
at the top right.
Personalization
Output Folder
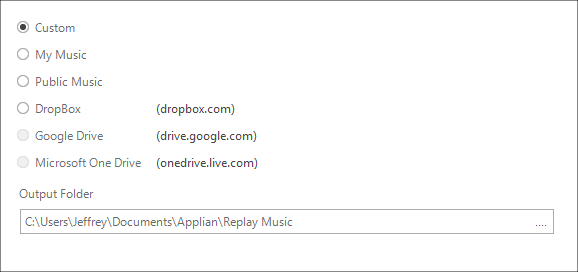
These settings allow you to change the storage location for your recordings. Recordings can be stored locally or on cloud services if you have them enabled. Links are provided for common cloud services. You can also manually change the Output Folder location by typing in the Output Folder field, clicking the "..." at the end of the field, or by clicking the Output Folder icon ![]() in the main toolbar.
in the main toolbar.
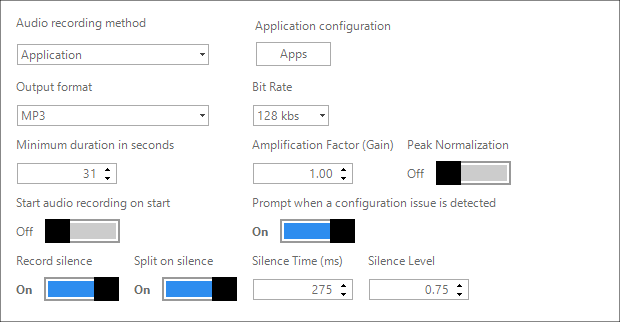
Recording Settings
Naming Rules
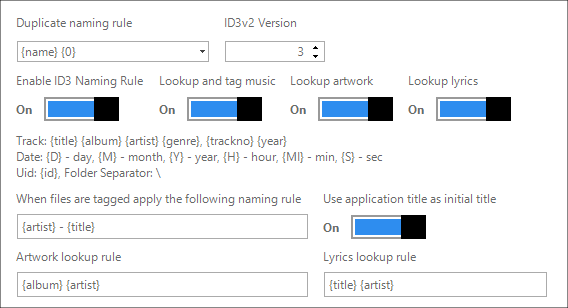
Replay Music uses a curly bracketed (aka braces) shorthand for naming files. This shorthand allows for easy naming of recordings based on a series of rules.
Track: {title} {album} {artist} {genre} {trackno} {year}
Date of the recording: {D} - day, {M} - month, {Y} - year, {H} - hour, {MI} - minute, {S} - second
Uid: {id} (a.k.a. the order in which file was recorded), Folder Separator for creating subfolders: \
So, if you wanted a tagged file to be named by album, artist, and then title with underscores between, you might use {album}_{artist}_{title}.
If you wanted to put the tagged file into subfolders, artist first and then album, and include the track number, you could use {artist}\{album}\{trackno}-{title}.
If a recording is not automatically tagged, you might need to manually tag it for the file naming rules to apply.
Override Tags
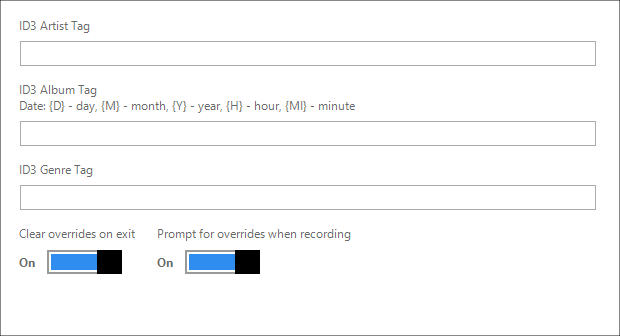
If you are recording an album, and you already know the Artist and Album information, you might want to override the automatic tagging and naming system. In these fields, you can enter information that will be applied to all of the recordings.
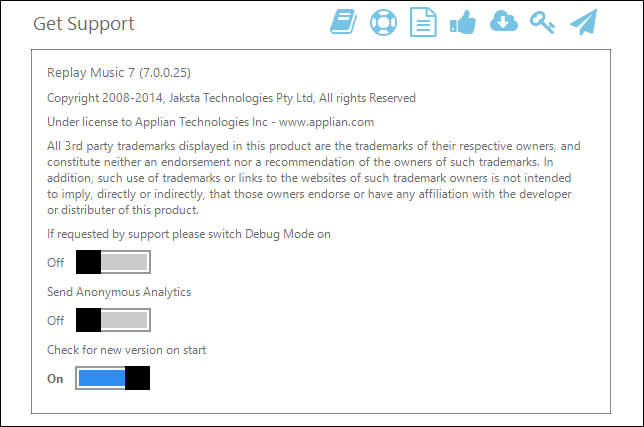
If you are having trouble with Replay Music 7, we may ask you to turn on "Debug Mode". Turning on this option will save additional information on your usage of Replay Music to help us diagnose problems.
By providing us with anonymous analytics, you can help us understand what parts of Replay Music are used the most, so that we can improve the product.
If you leave the Check for new version on start option on, Replay Music will notify you when a new version of the software is available when you start the program.
Across the top of the Get Support page are icons for other support purposes. You can hover over each on to see a tooltip for what they do.
Occasionally a track will not be properly tagged with artist and album information. You can give Replay Music another chance to tag unrecognized tracks.
To query the music database and attempt to tag a track again:
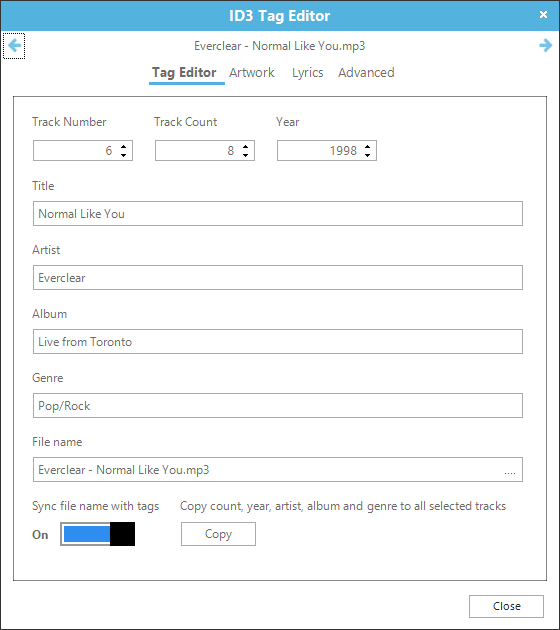
You can edit information that is saved along with each recorded song. This allows you greater control over how songs are labeled, or allows you to properly tag a song that is unrecognized by Replay Music. You can edit tracks one at a time, or several at once.
To view and manually edit track information:
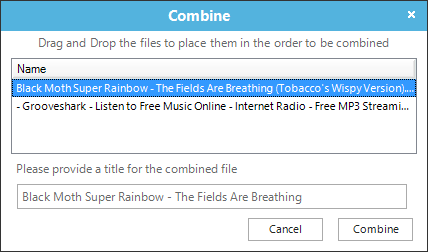
Sometimes, for dramatic effect, songs will have pauses or periods of silence in them that are longer than the Silence Time in Recording Settings. If a song has been unintentionally split, the multiple parts can be recombined. Select the fragmented files, right-click, and select Combine. The Combine interface will open. Place the fragments in the appropriate order, give the new combined recording a name, and press Combine. The combined recording will appear in the Replay Music 7 recording listing.
You can also use Replay Music to record LP's or cassette tapes to your computer. Here's how:
Alt + R = Start or Stop recording
Alt + S = Split recording
Del = Delete selected recording(s) from computer
F2 = Open the ID3 Tag Editor
Enter = Play selected recording
Ctrl + I = Import selected recording(s) into iTunes library
Ctrl + W = Import selected recording(s) into Windows Media Player library
Ctrl + O = Show selected file in Windows File Explorer
Ctrl + C = Combine multiple selected files
Alt + A = Show the album artwork in the Properties Window
Alt + L = Show the song lyrics in the Properties Window
Alt + T = Lookup ID3 tags (artist, song, album, etc) for selected song(s)
Alt + Enter = Open the recording properties window
Alt + I = Open file browser to Import songs into Replay Music
F1 = Open web browser to the Replay Music support page
Alt + F4 = Quit
The Application recording mode requires Secure Boot to be disabled on Windows 8 systems. The benefit of the Application recording mode is that each audio source can be isolated, providing a clean recording. You can still recording in Stereo Mix mode without disabling Secure Boot, but then the recordings might overlap with other audio playing on your computer, such as system sounds. You will need to be careful to turn off system sounds and not have any other audio play during a recording.
You might want to print out these instructions or have them open on a mobile/secondary device since disabling Secure Boot involves restarting your computer. You might also want to bookmark this page to return to after disabling Secure Boot.
Here is a video walking through the steps: http://www.youtube.com/watch?v=XZcYbxOcPV0
Once Secure Boot is turned off, you will be able to use the Applications recording method to get clean recordings.
The End User License Agreement can be reread here.
Song recognition uses technology licensed from Rovi Corporation and AMG. The license agreement is here.