Stream It. Record It. Keep It.

View quick introductory video on the features of Replay Radio 9.
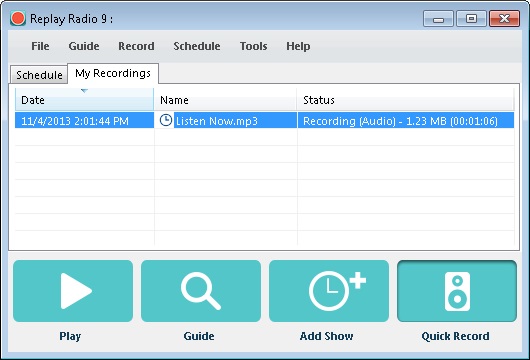
Replay Radio is the perfect solution for recording online radio broadcasts of your favorite talk radio, news, and music shows. When you launch Replay Radio 9, you are greeted with our streamlined interface. At the top is the menu navigation. In the middle is the listing of your scheduled recordings as well as previously recorded content. At the bottom are buttons to begin recording your favorite shows.

If you are currently listening to a show on you computer and want to record it, simply press the Quick Record button. An audio recording will begin, and it will be saved under the My Recordings tab. For more information, please consult the How to Record Now - Quick Record section of this User Guide.
If you want to schedule a recording, and you already know the website URL (Uniform Resource Locator, a.k.a. web address) for the show, click the Add Show button. Consult the How to Schedule a Recording Manually section of this guide for filling out the scheduler details. Sometimes a radio show is streamed from a different location than the website you see in your browser. To discover the true URL, we provide a handy URL Finder.
The Guides in Replay Radio 9 also make it very easy to setup scheduled recordings so that you do not need to fill in a bunch of details yourself. Click the Guide button, and our Replay Media Guide will appear. You can then search for your favorite shows, stations, and podcasts or discover new and popular ones. We collate the list so that the proper settings are in place for you to enjoy right away. For more information, check out the How to Schedule a Recording via the Guide section.
The Tune button can be used to quickly start listening to a station. Simply make sure that a scheduled item is selected, and then click the Tune button. The online radio station associated with that scheduled item will open for you to listen to the current live programming. More information can be found in the Tuning to a Live Online Radio Station section of this User Guide.
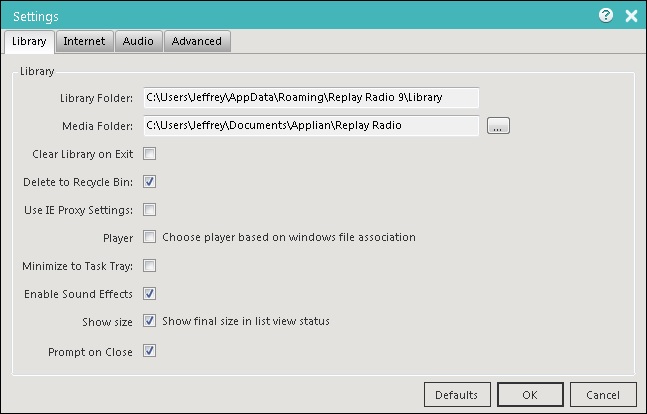
Clicking on the My Recordings tab in the middle section will take you to all of your recorded radio episodes and podcasts. Recordings are saved in the Media Folder of your choice. This can be a local folder or even a Dropbox account if you have one. The choice of storage location can be configured in Settings.
View video on how to use the Quick Record feature.
If you have audio currently playing on your computer that you would like to record, press the Quick Record button. The Replay Radio interface will switch to show the current recording session in the My Recordings tab. Additionally, the icon in the top left will change to a red circle. When you are done recording, press the Quick Recording button a second time. Alternately, you can right-click on the listed recording and choose Stop.
Audio recordings can also be started using the Record menu option or via the the Control + R keyboard shortcut.
To play back completed recordings in the My Recordings list, simply select the entry, the Play button will become active, and press Play. Alternately, right-click on the entry and select Play ..., or just click the Enter/Return key on your keyboard.
Recordings are saved in your Media Folder which can be changed in Settings. To go to your Media Folder, click on Tools/Open Storage Folder from the menu. To find a specific recording, right-click on the recording and select Show in folder.
Watch this video for an overview on using the Guide.
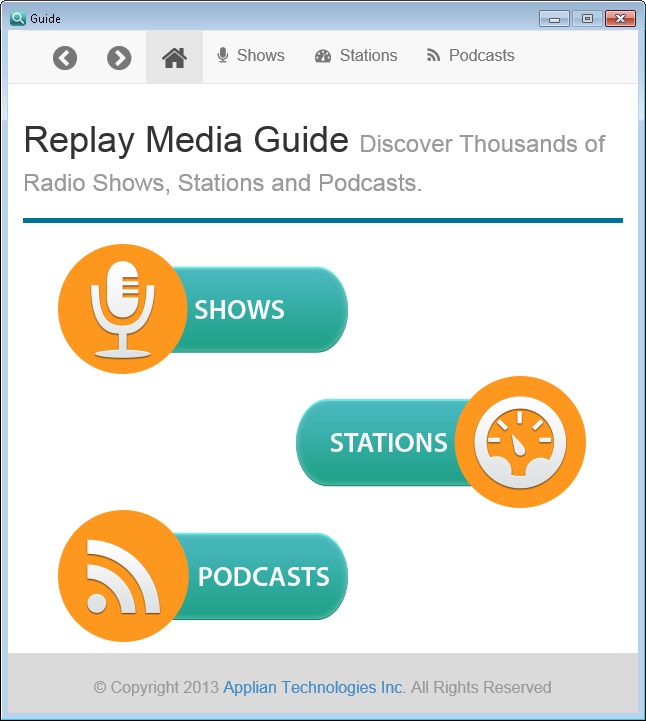
Clicking the Guide button on the main Replay Radio 9 interface or using the menu option brings up our Replay Media Guide where you can discover thousands of online radio stations and podcasts. The Guide is divided into three sections (Shows, Stations, and Podcasts) which can be navigated to via the top navigation bar or the large buttons in the middle of the interface. You can return to the main media selection page by clicking the "Home" icon in the top navigation bar.
We provide three different ways for you to discover and add a radio show to Replay Radio 9 for recording: the Find, Popular, and Categories buttons at the top of the Shows page.
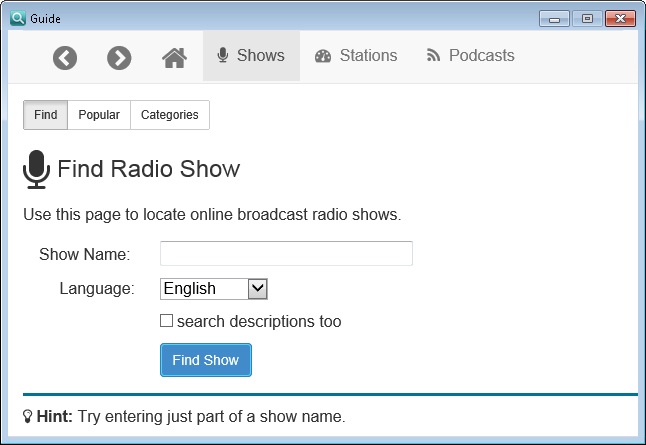
Using the Find button, you can search for a specific show by name. When you click Find Show, a list of available programs will be presented that match the search terms. Click the ![]() button to go to the show.
button to go to the show.
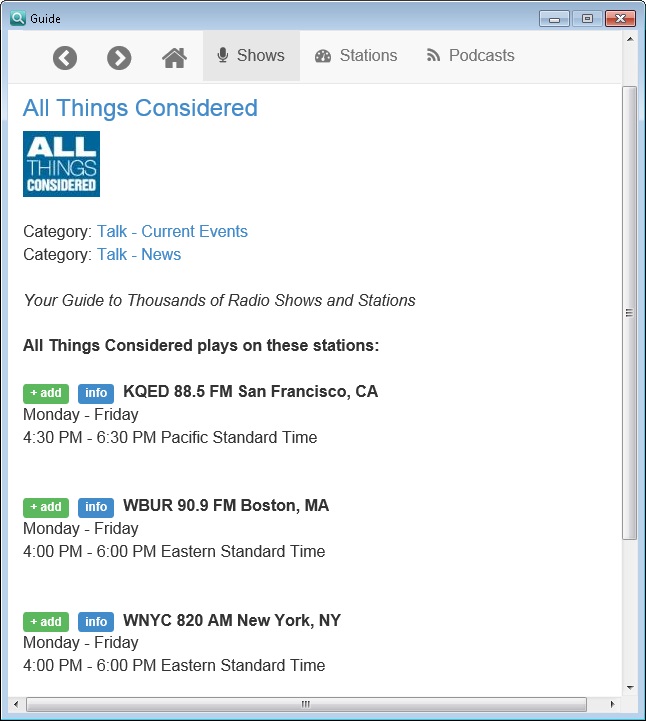
You will then be presented a list of all the stations in our database that have that particular show. Simply click the ![]() button to create a scheduled recording in Replay Radio 9. All the schedule details will be automatically filled out for you. For more information on adjusting the schedule details, please look at How to Schedule a Recording Manually. Clicking the
button to create a scheduled recording in Replay Radio 9. All the schedule details will be automatically filled out for you. For more information on adjusting the schedule details, please look at How to Schedule a Recording Manually. Clicking the ![]() button will take you to the show lineup for that station.
button will take you to the show lineup for that station.
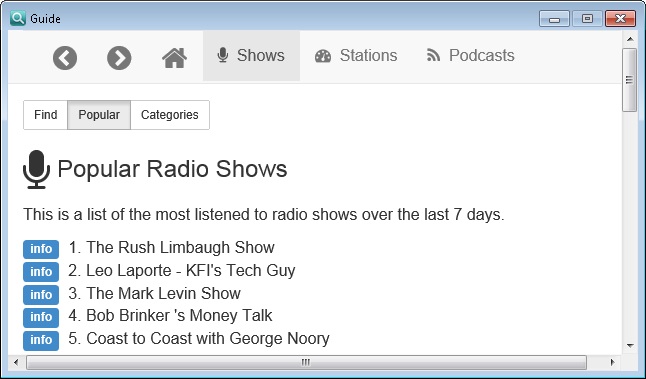
The Popular button will present to you a listing of the currently most listened-to radio programs.
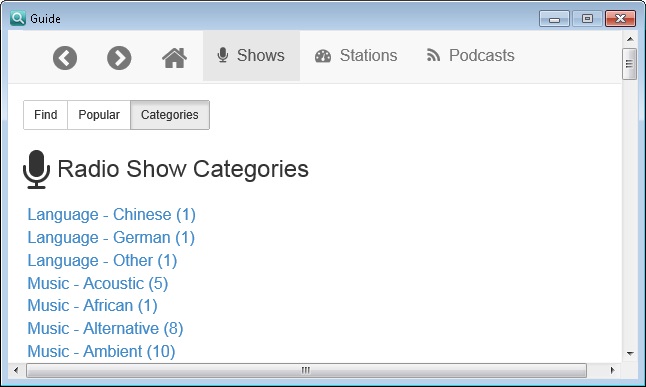
The Categories button breaks our database of programs into categories in case you prefer to search for content by genre.
Similar to the Shows button in the Replay Radio 9 Guide, the Stations button allows you to discover online radio stations by searching with the Find button, perusing through commonly listened-to shows via the Popular button, or by picking a genre using the Categories button. Once you have located a station, if you click the ![]() button while at the stations listing, the scheduler will open with default values for the station. You will need to choose appropriate recording times and duration (see How to Schedule a Recording Manually for more details). You can also click the
button while at the stations listing, the scheduler will open with default values for the station. You will need to choose appropriate recording times and duration (see How to Schedule a Recording Manually for more details). You can also click the ![]() button to learn more about the station and get a show lineup. On the show lineup page for each station, we also offer a
button to learn more about the station and get a show lineup. On the show lineup page for each station, we also offer a ![]() button which will automatically start playing the station.
button which will automatically start playing the station.
As with the Shows and Stations buttons in the Replay Radio 9 Guide, the Podcasts button allows you to discover podcasts by searching with the Find button, or by picking a genre using the Categories button. Once you have located a station, you can click the ![]() button to learn more about the podcast. If you click the
button to learn more about the podcast. If you click the ![]() button while at the stations listing, the scheduler will open with default values for the station. You will need to choose appropriate recording times and duration (see How to Schedule a Recording Manually for more details).
button while at the stations listing, the scheduler will open with default values for the station. You will need to choose appropriate recording times and duration (see How to Schedule a Recording Manually for more details).
Here is a video on manually scheduling a recording for Direct download and one for audio recording on a schedule.
Replay Radio contains a sophisticated scheduler, which allows you to schedule regular and unattended recordings. The scheduler takes into consideration the time zone of the source, and also handles changes in daylight savings between the source and you. This is particularly important for regular radio recordings.
When specific programs are added via the Guide, the settings for the show will be appropriately pre-populated. If you have added a station via the Guide, then you will need to set the appropriate start time and duration for which you wish to record.
Recordings can also be manually setup for scheduling. To manually create schedule, press the Add Show button at the bottom of Replay Radio. New schedules can also be created via the Schedule\New menu item or right-clicking in the Schedule listing and choosing New. Similarly, existing schedules can be copied, edited, and deleted using the Schedule menu or right-clicking.
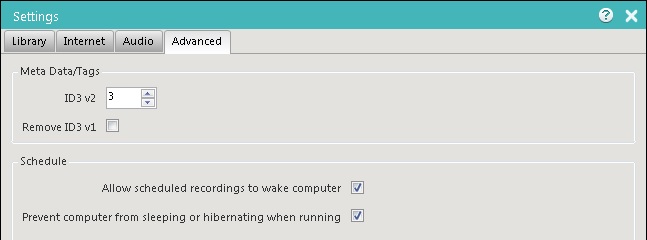
Replay Radio does not need to be running when a recording is scheduled. It will automatically start. See Settings->Advanced for more info.
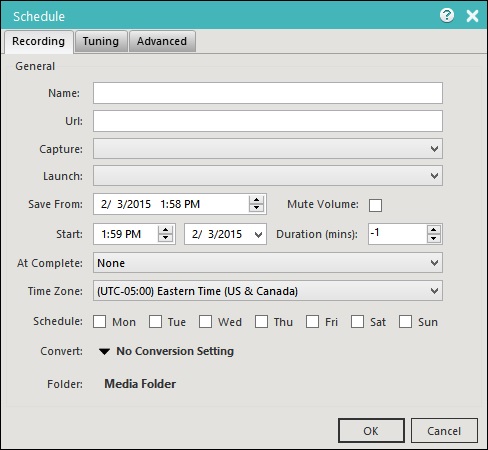
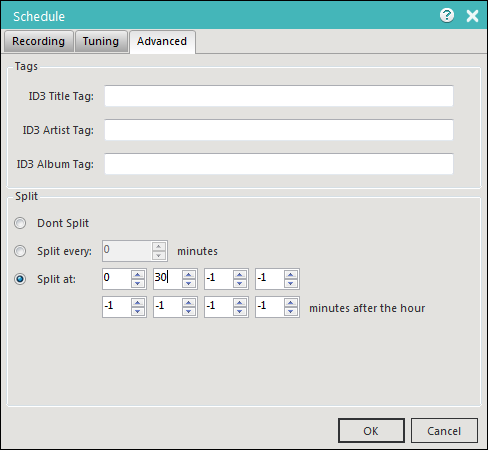
You can configure a scheduled recording as follows:
We recommend that where possible always use the Schedule menu from within a Guide. This will ensure times and time zones are set correctly for the source. We also recommend that you do a recording test to make sure the stream is recorded with the given parameters. Right-click on the schedule item and choose Start Recording. If the recording appears in My Recordings, you are all set.
Schedule items can be imported to and exported from Replay Radio using the relevant options in the Schedule menu item. This allows you to share your favorite program schedules with other Replay Radio users.
Watch this video for an overview on managing your recordings.
While the Schedule tab contains things you want to record, the My Recordings tab contains programs which have been recorded or are actively being recorded. When you switch from the Schedule tab to the My Recordings tab, the Tune button turns into a Play button. Simply select one of your completed recordings from the listing and press the Play button. If the format of the recording is supported by Replay Radio, it will be played from within Replay Radio. If the format of the recording is not natively supported, an external player (based on operating system settings and the programs you have installed) will be launched to playback the file.
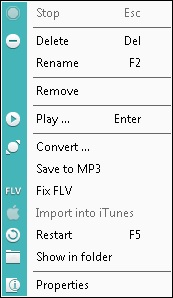
After selecting a recording, you can also play it by clicking the Enter/Return key on your keyboard, or right-clicking on the entry and selecting Play ... from the drop down list. From the drop down list you can also delete the file from your computer, rename it, remove the entry from the listing, convert to other formats, and import to iTunes (if recorded in an iTunes supported audio format).
To convert a recording from one audio format to another, select the entry from the recordings list, right-click and choose Convert ... from the drop down menu. You will then be presented the option to convert to one of many different formats. Starting a conversion does not delete the original file - in case you desire to keep the original or change your mind about the conversion type. The specifics of each conversion setting can be viewed via the Tools/Conversion Settings menu option.
To clear the listing of recordings without deleting them from your hard drive, you can use the Tools/Clear Recordings menu option. The My Recordings listing will be emptied, but your recordings will remain in your Media folder. Alternately, you can select all the entries in the listing, right-click with your mouse, and choose Remove.
To delete one or multiple recordings from your hard drive, select them in the My Recordings listing, right-click and choose Delete or press the Delete key on your keyboard. Recordings can be deleted immediately or moved to your Recycle Bin (default behavior) based on chosen Settings.
Watch this video to learn how to quickly start playing your favorite station.
While you can tune to and listen to online radio stations from your own browser, you can also do so from Replay Radio 9. If you have created any scheduled recordings using our Guide, you can simply click on the entry in the Schedule list and then press the Tune button. The station that is used for the schedule will then be launched.
If you have our Guide open to a station, you can click the ![]() button below the station name to start listening to that station.
button below the station name to start listening to that station.
You can also right-click on any scheduled item and select Tune to Station or use the Control + T keyboard shortcut.
If you manually created a scheduled recording, you will want to make sure the Tuning tab is appropriately filled out in the schedule properties. For more information, please refer back to How to Schedule a Recording Manually.
If you want to record a show that is not in our database, you might need to discover the uniform resource locator (URL) for the streaming media. The URL is not always the same as the webpage of the station, especially if you are interested in scheduling a Direct download of the radio stream as opposed to having a webpage open each time a recording begins. For this purpose, our Url Finder is available from the Tools menu. The first time you run Url Finder from Replay Radio 9, you will be asked to install our Replay Url Finder helper application. The installation process may also require the installation of the Applian Network Monitor or WinPcap.
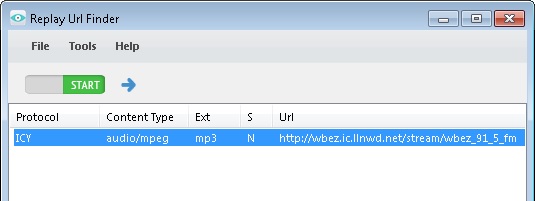
Simply click the green START button, and then open a new webpage to the online radio site. The Replay Url Finder will then determine the actual address that the show is coming from. Then, either click the blue arrow or right-click on the discovered address and choose Schedule in Replay Radio to add the station to Replay Radio. The discovered, Direct download address will be automatically added to the URL field of the new schedule item. If you want to also tune to this station for listening, enter the original website address to the Tuner tab. Please read How to Schedule a Recording Manually to complete the schedule setup.
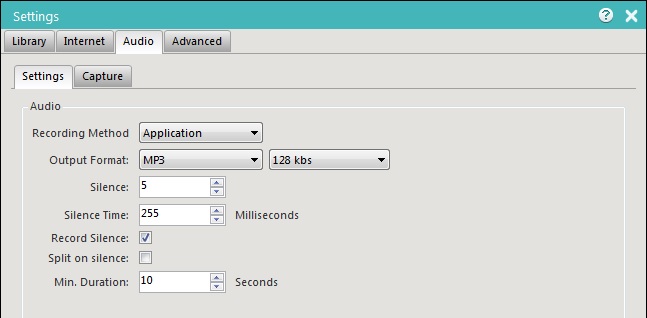
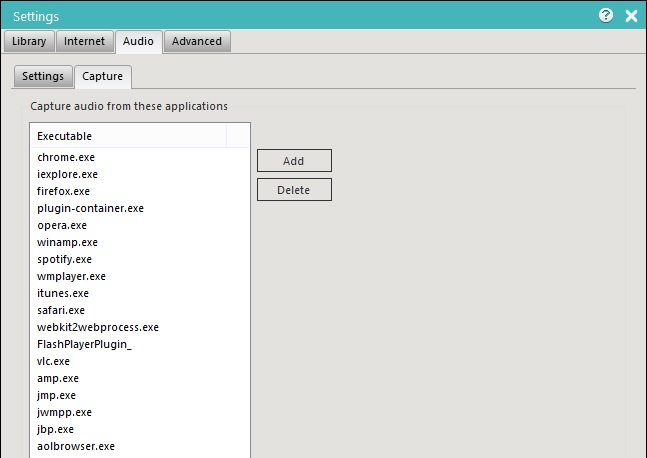
In general, the Settings for Replay Radio will not need to be adjusted. We offer the ability to change some aspects of the program to suit your individual needs. Most users will be interested in the Library and Audio settings, and below you will find a description.
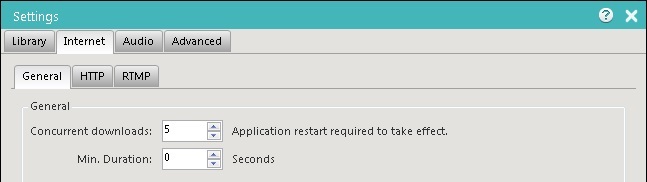

To increase the speed of some downloads, Replay Radio can use a method called segmented downloading. This is where a single download is broken to several smaller downloads (segments) and each is downloaded at the same time. The speed boost obtained is dependent on your network connection, your computer and the server streaming the media. This does not apply to live streams.
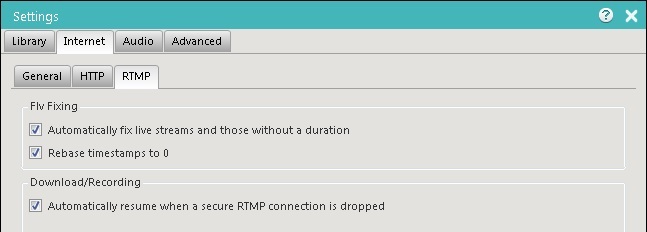
Live FLV streams sometimes send incorrect timestamps. This means the file created for the download plays back incorrectly. The following settings allow you to control how these are fixed.
When I install Replay Radio 9, there is a message about disabling Secure Boot. What is that?
Secure Boot is a feature on modern Windows 8 computers to reduce the chances of being infected by root level viruses. A side effect of Secure Boot is that it prevents the appropriate functioning of our audio recording software in Replay Radio 9. Direct downloads of internet radio streams are unaffected, but some radio streams can only be captured via audio recording.
To disable Secure Boot and allow audio recording perform the following steps.
First, always make sure that you start the URL Finder prior to browsing to the media that you want detected. Sometimes online media is cached if you've already played it once. This can prevent the URL Finder from seeing them. If you've already played the stream once, re-start the browser or clear its cache before opening and starting the URL Finder.
Second, check the settings under the Tools/Settings menu item. Either the Network Monitor or WinPcap needs to be installed. If one is not working, try the other one.
Third, contact our technical support so that we can help and potentially add the site's URL to our database for other customers to similarly enjoy.
Replay Radio has two main ways to record online media: Direct Download and Audio Recording. Direct download is the most desirable way to record. Direct download works by making a digital copy of the stream sent from the server. Here are some of the benefits: