Stream It. Record It. Keep It.

Welcome to Replay Video Capture, the fastest high-speed on-screen video recorder ever made. With Replay Video Capture, you can turn anything you see on your PC's screen into a high quality video file you can play anywhere.
Replay Video Capture is especially well suited for recording:
High Quality Recordings
Capturing and compressing on-screen video in real time can require a lot of your PC's CPU power. Replay Video Capture is specially designed for this task, as it uses special high quality MPEG-2 codecs that give perfect looking recordings of videos without freezing up your PC.
Convenient
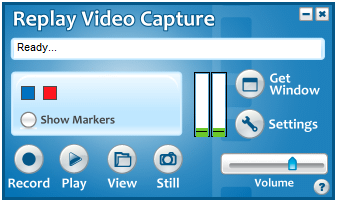
To make it easy to capture a portion of your screen, Replay Video Capture can often automatically locate the region of your screen where video will be played. Or, you can choose to mark an area of the screen manually by moving markers yourself. Either way, setting up your recording area is a snap.
System Requirements
The first time you run Replay Video Capture on a Windows XP machine, you'll need to make sure you can record audio and video properly. For Windows Vista and Windows 7, this is done automatically.
To start, you'll be asked how audio is to be recorded like this:
Next, you'll see the Audio test screen:
Replay Video Capture will make it's best guess as to what the audio settings should be, but you can override them if you like. Once the Audio Source and Input are selected, click Test to ensure you can record audio. After a few seconds, if the test is successful, click OK to save the audio settings.
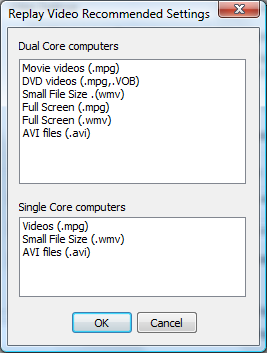
The Settings dialog will appear next. Click the Recommended Settings button to pick a configuration that most resembles your system and recording needs:
To make subsequent changes, just click the Settings button. The Settings dialog appears as shown:

Once the audio and video parameters are set, you can focus on recording videos. First, you need to mark a region of the screen to record as a video, and then you can start, stop or pause recording.
Important Note: In almost every situation, you don't need to record the entire screen to get the best video quality. Most video sources broadcast at no more than 640x480 pixels, and then up-scale the video to fit a full screen. This means that you can record at 100% (rather than 200% or full-screen), and get great quality. Plus, recording from a smaller video rectangle ensures that Replay Video Capture uses less CPU power, and this makes smaller files and greatly reduces the chances of dropped frames and choppy recordings.
Marking a Recording Region
Using Get Window
The easiest way to mark a region is to use the Get Window function. Here's how:
You can often find a Windows Media Player video window this way, or even locate an application window to record demo videos from. You can also drag the markers to adjust the recording region. Click Home on the Replay Video Capture main window to remove the marker display.
Manually Marking a Region
You can also manually drag the markers from Replay Video Capture to the upper left and lower right parts of the recording region. This may be necessary if Replay Video Capture can't locate the video window, or if you'd like to record a region not defined by a window.
To manually mark a region:
Recording
Once you've marked an area to capture, it's easy to record from it. Here's how:
Starting Recording
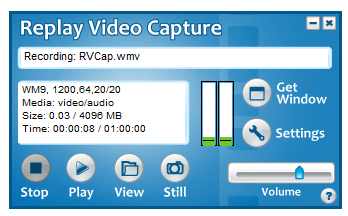
To start a recording, press the Record button. In a moment, the region you selected will be recorded as a video. As you're recording, the Record button turns into a Stop button, and Play becomes Pause.
Hint: You can also start recording by using the keyboard. Press Ctrl+F12 to start and stop recording when Replay Video Capture is open.
Pause and Continue
If you'd like to pause recording, click the Pause button. Click Restart to resume recording.
Stop Recording
Click Stop to end the recording. Your recorded file is saved.
Replay Video Capture 5 lets you take a photo of any frame of your video as it plays. This also works with capturing a part of your screen. here's how to do it:
Recording from DVD's is easy using Replay Video Capture. Here's how to do it:
Note: You are legally allowed to record clips from DVD's for your own personal use. Replay Video Capture is not intended to be a way to circumvent copy protection on copyrighted DVD's.
Hints on how to record high quality DVD videos:
You need to make sure that your computer can sustain a recording frame rate of at least 29.97 for NTSC, 25 fps for PAL. XP dual core computers with CPU speed of 2.0 GHz or higher can easily do this. On Vista and Windows 7 you may have to set Windows to "Best Performance" mode instead of "Best Appearance" as shown under Video Capture Options. To check if the DVD frame rate can be sustained, make a short two minute recording, use DVD video format, 6000 kbps, 29.97 fps, 720x480 size. When recording Replay Video shows the actual achieved frame rate next to the preset rate in the Status window (for example 29/27 or 29/31 - the first number is the preset rate 29.97 the second is the actual achieved frame rate). Make sure the actual frame rate does not go much lower. If this happens consistently you can still record DVD's but the video quality may not be as good especially for high motion scenes.
The recorded DVD file needs to be "authored". The authoring creates the DVD folders VIDEO_TS / AUDIO_TS and usually takes a few seconds to a few minutes. It can be done automatically when recording is finished. The DVD folders can be burned as Data Disc using any DVD burner software (a two hour movie takes about 15 minutes to burn.) The recorded DVD does not have a menu so it begins playing when inserted into the DVD player. The DVD video has chapters set every 10 minutes such that the DVD can be quickly scanned in 10 minutes increments.
To maintain a reasonable frame rate of at least 20 fps even on slower computers, please make sure:
Once you've finished recording, you can see your last recorded video by clicking Play.
To see all your recordings, click the View button. The View screen appears:
Double click a file to play it, or select and right-click to play, rename or delete a recording.
Click the Open Output Folder menu option to open a file explorer window for your recorded video files.
Note: On some systems, you may need to install ffdshow to play MPEG-2 files recorded by Replay Video Capture.
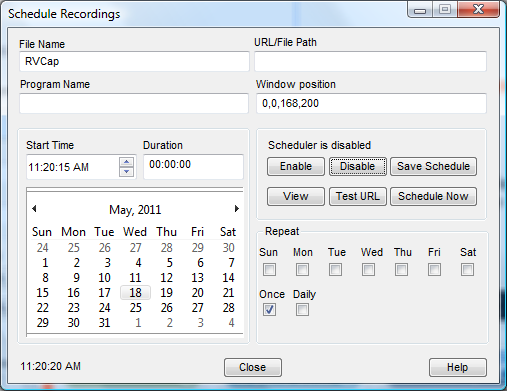
You can make Replay Video Capture open a program or a web page, and start recording automatically at a preset time or according to a schedule. Here's how to do it:
After doing your first recording, play it back once and check the volume level. If it is too loud or too soft, you can use the Volume slider on the main screen to increase or decrease the recorded volume.
This section is a reference for the Settings dialog:
Recommended Settings: Use this button to automatically configure the Audio Settings and Video Settings for the speed of your PC and desired output quality.
Audio Settings: Set the Audio Bit rate as the quality for recorded audio. In general, 64 Kbps is fine for most recording, but higher bit rates are better, especially when music is involved. Click Audio Setup / Test to locate or manually set the best audio recording inputs on your PC.
Video Settings: Choose the Video Bit Rate, Frames per second, and Video Format (MPEG-2 or Windows Media). The Recommended Settings button will do this for you, but you can manually adjust these parameters here if you like.
Disable Video Acceleration: Use this option if you record Windows Media Player or Real Player windows on Windows XP or lower versions. Otherwise keep this option unchecked.
Recording Options:
Using the Set Top Window Feature: Replay Video Capture records exactly what it can see on your screen. When enabled, the Set Top Window option will allow you to keep the video window you are recording always in the forefront. Any window that appears while you are recording will pass behind the active recording window. There are some requirements for this feature to work well:
Recording File Size / Time: This lets you limit the recording time or file size for each recording. If both values are set, then whichever limit is reached first will cause recording to stop automatically.
Miscellaneous:
I can't play MPEG-2 files created by Replay Video Capture
You may need to install something called ffdshow to play these. Ffdshow contains a MPEG-2 decoder. You can install ffdshow from here.
Video quality is choppy
To get the best quality video - especially on slower machines - try the following:
I'm having trouble recording audio and receive an error. This fix applies to those running Windows Vista Only. Use this fix if you receive one of these error messages:
With Windows Media selected the error message is - Error: "Cannot connect SndCap to ASF Encoder"
With MPEG 2 selected the error message is - Error: "Cannot connect audio to encoder"
I'm having trouble recording audio.
On some PC's, only the Universal Audio Driver will work. Go to Settings, Audio Setup/Test, and select the Universal Audio Driver. Use the Universal Audio Driver only if the Test option fails to locate a working audio recording line.
The Universal Audio Driver Option isn't working for me
To use the Universal Audio Driver, in some cases you may need to open Replay Video Capture before opening your browser or video playback application.
The Video Window is all black when playing back the recording
If this occurs, you will need to disable "hardware acceleration" on your PC. Here's how to do it: