Stream It. Record It. Keep It.

Welcome to Replay Video Capture, the on-screen video recorder specifically designed for hassle-free video capture.

Replay Video Capture is especially well suited for recording:
Capturing and compressing on-screen video in real time can require a lot of your PC CPU power. Replay Video Capture is designed for this task, as it uses high quality MPEG-2 and WMV codecs that give perfect-looking recordings of videos without reducing your PC performance.
When playing games in Windowed mode, Replay Video Capture can record your game with little or no impact on game performance and frame rates. Recording of Full HD game windows (1920x1080) is equal or better than recording in Full Screen mode even on computers that don't use standalone video cards (Windows 7/8/10 running on Intel HD Graphics or higher versions CPUs).
Background mode is a unique feature introduced by Replay Video Capture. This mode lets you capture videos from your screen in the background so that the video RVC is recording doesn't have to be visible. The video can be covered by other windows and that won’t affect the recording at all. The Background Mode allows you to keep working on the computer while capturing videos.
This is another unique feature introduced by Replay Video Capture. You can enable the Thumb Mode by clicking on the "?" icon in the main program window and click on Enable Thumb Drive Mode. When you enable the Thumb Drive Mode, you can run the program from a USB drive without the need for another installation.
To make it easy to capture a video, Replay Video Capture often automatically locates the region of your screen where the video will be played. You can also choose to mark an area of the screen manually. Either way, setting up your recording area is a snap.
(see also the Quick Guide under Settings/Help)
Replay Video Capture should only be installed on the administrator account, however all clients will automatically get shortcuts if the option “Make shortcuts available to all users” is checked during the installation. Every user has his own recording folder and settings. The administrator installation doesn't need to run in order for the clients to run their versions. Only the administrator can uninstall the program.
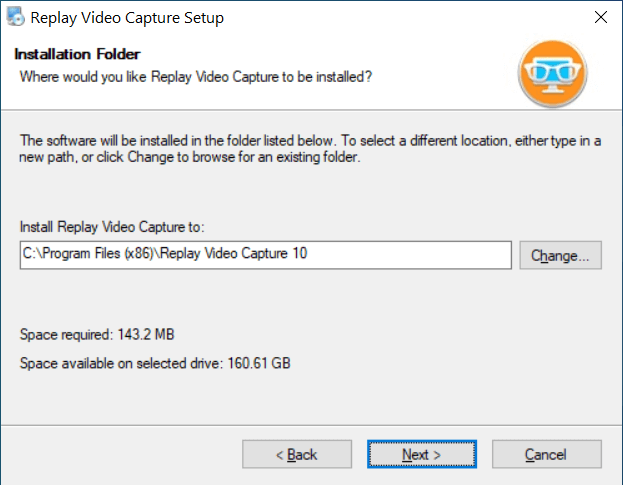
To install Replay Video Capture, do the following:
Notes: If you’re running Windows 7/Vista - when opening Replay Video Capture your desktop theme is changed to Windows Basic. The Basic theme greatly enhances the performance and speed of your system. Your current theme will be restored when you exit Replay Video Capture.
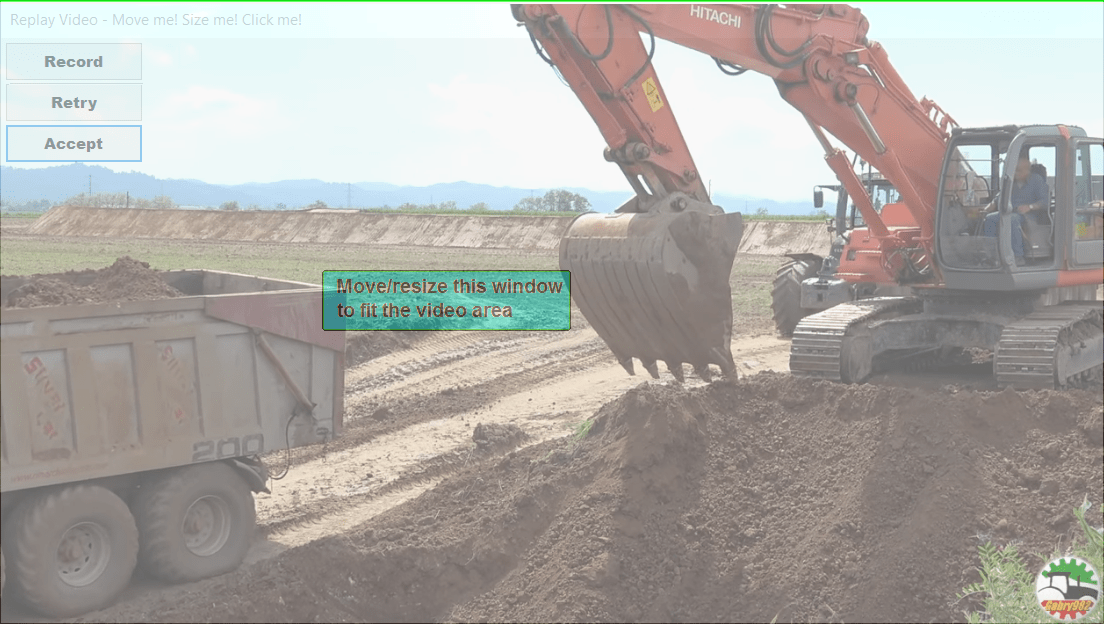
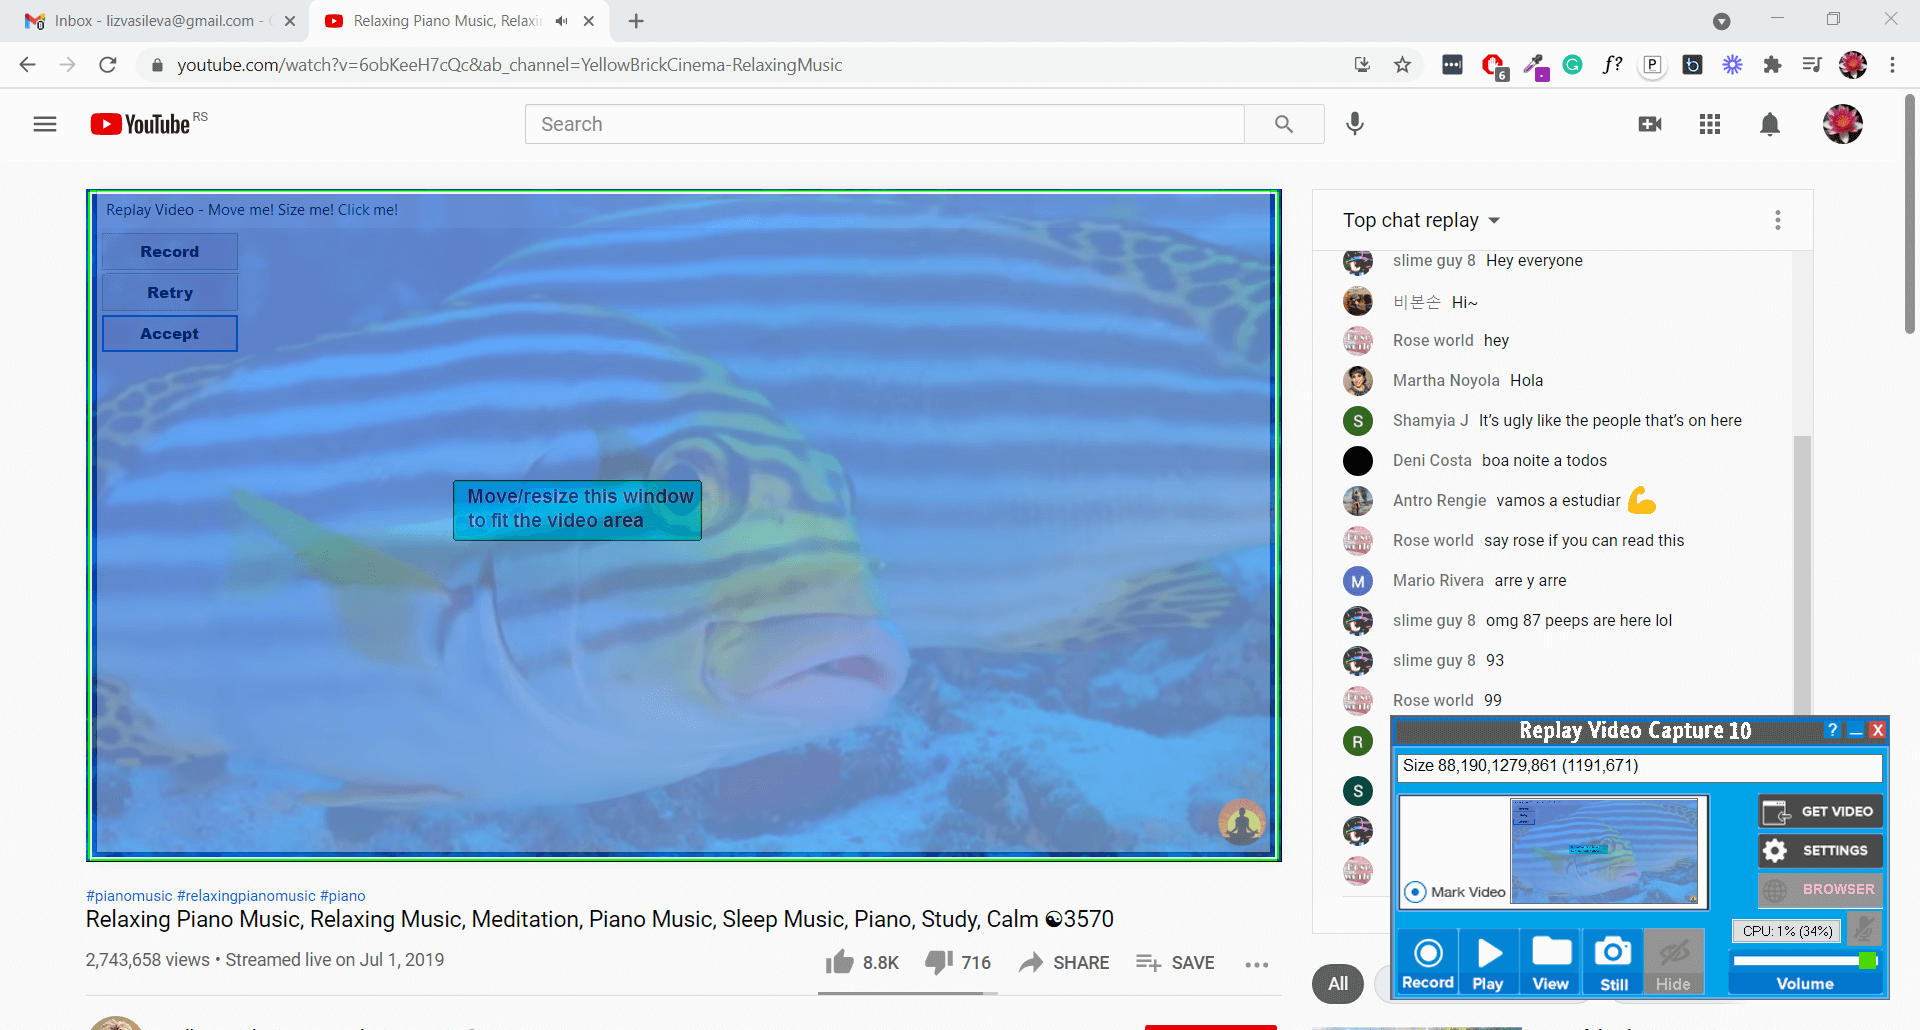
Only motion videos can be automatically detected when using the Get Video button. A transparent marking window is shown over the video area (see below). You can resize or move this window to fine-tune the recording area or click ”Retry” to redo the detection. You can also mark the recording area manually by using the Mark Video Window button.
First, you need to mark a region of the screen to record as a video. You can do that by clicking on the Get Video button or selecting the Mark Video Window radio button. Then, click on Record to start the recording. You can stop or pause the recording at any time.
Important Note: In almost every situation, you don't need to record the entire screen to get the best video quality. Most video sources broadcast at no more than 640x480 or 720x480 pixels, and then up-scale the video to fit a full screen. This means that you can record at 100% (rather than 200% or full-screen), and get great quality. Plus, recording from a smaller video window ensures that Replay Video Capture uses less CPU power. This makes smaller files and greatly reduces the chances of dropped frames and choppy recordings.
If your recoding looks choppy or the audio is out of sync, follow a simple rule to make the recording window not bigger than 1/3 of your screen area (640x480 or 1280x720). If you’re recording a large window located inside the browser, you can use the zoom out function (Ctrl -) to reduce the size of the browser and the recording square.
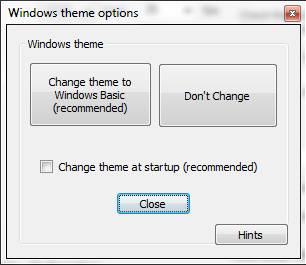
Changing Windows 7 or Vista Desktop Theme
Replay Video Capture changes the Windows 7/Vista desktop theme from Aero to Windows Basic. This greatly improves the general speed of your Windows system by disabling the Aero video effects. This results in better quality video capture of your screen. The initial theme is restored when Replay Video Capture closes. We highly recommend using this feature but if you want to keep Aero enabled, open Settings - Tools - Setup Windows theme. Note that the Windows Basic feature is not available in Windows 8 and 10.
To select or deselect the Windows Basic theme click Tools / Setup Windows theme. Make your selection in the dialog window that pops up.
Another way to increase the performance (speed) of your system and avoid dropping frames is setting Windows Performance Options to "Best performance" instead of "Best appearance". “Best appearance” is the default Windows setup. This can be done from Replay Video Capture Settings - Tools - Windows Best Performance.
To change between different marking modes click Settings - Tools - Setup video detect mode
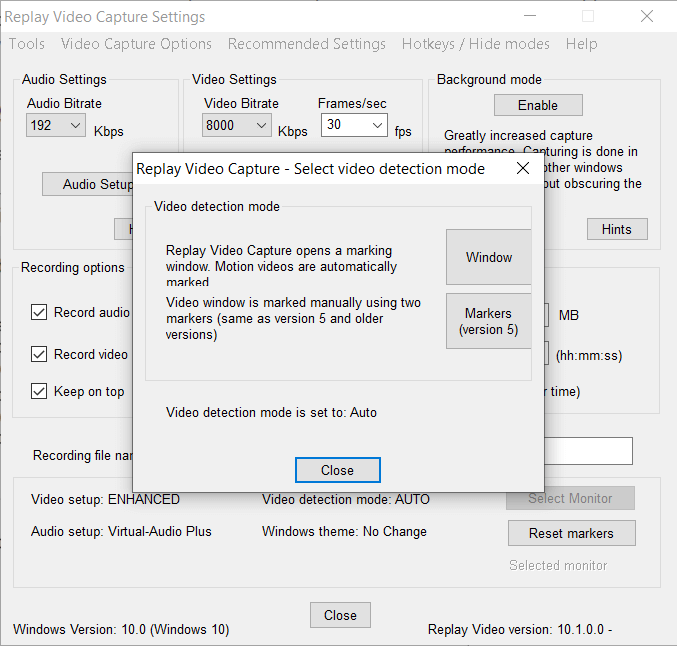
Replay Video Capture provides a Window mode and a Marker mode to mark the video recording area. The Marker mode is provided for compatibility with previous versions. The coordinates of the marked window are shown on the main screen (x-Top, y-Top, x-Bottom, y-Bottom (width, height)).
Window Mode
In this mode a semitransparent marking window is displayed on the screen. The marking window can be moved and resized to fit the recording region.
The easiest way to mark a region is to use the Get Video function available from the Replay Video Capture main screen.
Replay Video Capture can detect motion videos and automatically mark the recording screen area. Begin playing your video then click Get Video. A semi-transparent window marks the video area on your screen. If the marked area is not what you want click “Retry” to run the detection again or move/resize window to fine tune the marking rectangle. You can also drag the edges or move the entire marking window to fit your video. Note that static images cannot be automatically detected this way.
Note: The automatic detection of the video window is done by a motion detection process. Therefore, it is important to start playing the video before using the Get Video function.
You can also mark a video window manually:
Marker Mode
This mode displays two markers, which can be manually dragged from Replay Video Capture main screen to the upper left and lower right parts of the recording region. This feature is provided for compatibility to older versions of the program.
To manually mark a region:
Recording
Once you've marked an area to capture, it's easy to record it.
Starting Recording
To start a recording, press the Record button. As you're recording, the Record button turns into a Stop button, and Play becomes Pause.
On Windows 7, Vista and XP computers, Replay Video Capture main screen is invisible to the recording even if the main screen image overlaps the recording area. To change this, open Settings and uncheck the box Set Top Window. However, this is not recommended when the Window detection mode is used.
Hint: You can also start/stop/pause recording by using the keyboard. Press the Record Hotkey to start and stop recording when Replay Video Capture is open (see below the Hotkeys section). Click Settings, Hotkeys on Replay Video Capture to setup/enable/disable the keyboard options.
Important Note: The motion smoothness of your recordings is highly depended on the frame rate that can be sustained by your computer. Normally, this should be higher than 20 frames per second (fps). During recording the preset and actual frame rates are displayed on Replay Video Capture main screen. For example, a 25/17 indicates a preset rate of 25 frames per second and an actual (achieved) rate of 17 frames per second. The ideal situation will be 25/25. To achieve a higher frame rate, make sure your Windows theme is set to Windows Basic for Win7/Vista or you're using the Background mode.
Pause and Restart
If you'd like to pause recording, click the Pause button. Click Restart to resume recording. You can also use the Pause Hotkey (see below) to pause and resume recording.
Stop Recording
Click Stop or use the Record Hotkey to end the recording. Your recorded file will be saved.
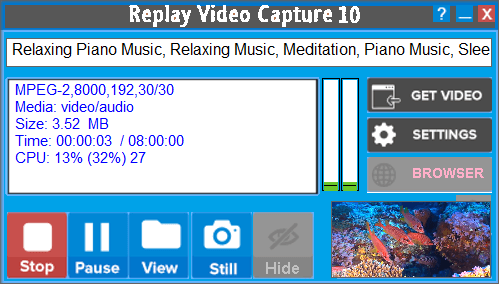
Playing or recording videos could load up your CPU quite a lot depending on the video size, video frame rate, HD, UHD formats, CPU performance and a few other factors. When using Intel Quick Sync or NVIDIA NVENC half of the normal CPU loading is transferred to the GPU (hardware encoding) which means, significant CPU loading reduction is achieved using these video formats. Replay Video Capture 12 displays the CPU loading as three (3) percentage numbers:
program loading (%),computer loading (%), cumulative average loading in time (%)
program loading is the Replay Video CPU loading
computer loading is the CPU lading generated by all running programs except Replay Video
cumulative average loading in time is the CPU loading average generated by all running programs
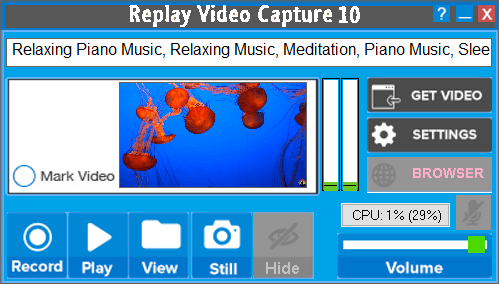
During normal computer operation without recording, the program and computer CPU loading are displayed as shown in the image below

During normal computer operation Replay Video Capture 12 gives audible warnings (beeps) when the cumulative CPU loading goes above 80%.
During recording, CPU loading is displayed as shown below. The third number represents the moving average of total CPU loading as a function of the elapsed recording time. It is this number responsible for CPU heating, slow down or other effects associated with overloading. If the CPU loading average is high during recording try lowering the frame rate and video window size or close other programs that responsible for CPU consumption.

Important: When using the Quick Sync video format on some Windows 7 older computers without recording, the program loading may be much higher than normal (normally below 10%). This is because this is not the actual Quick Sync but a Microsoft MP4 format which is quite slow. Use MPEG-2 in this case.
Background mode is particularly useful in the following situations:
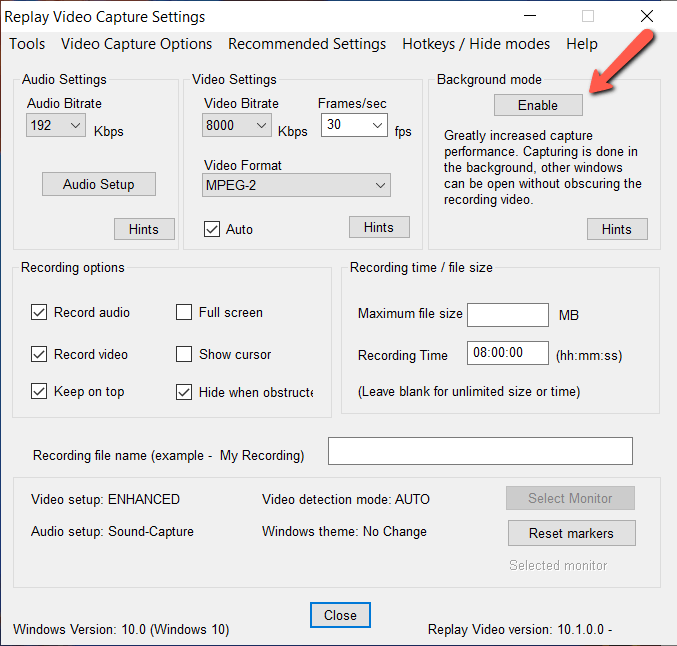
Set up the Background mode
Click Settings. In the Settings dialog, click Enable under Background mode.
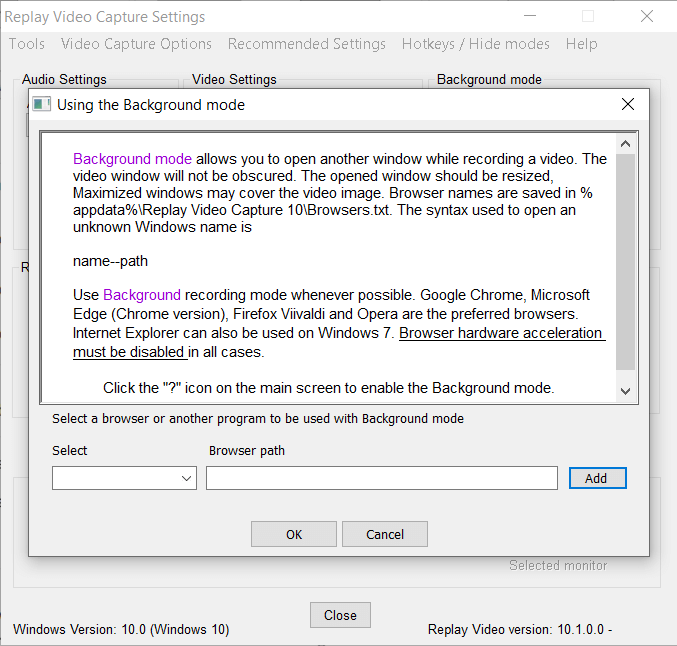
In the Background dialog that opens, you can select a browser or other program that you want to open while recording from the screen.
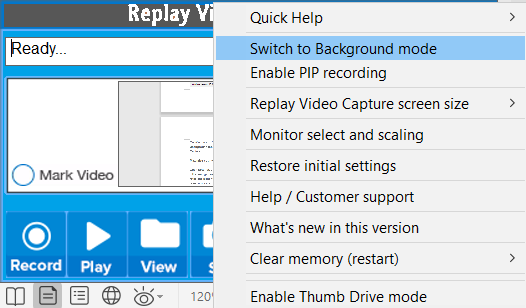
On Windows 8/10, you can click the question mark on the main screen, then click Switch to Background mode. This option allows switching between modes without restarting Replay Video Capture.

Once the Background Mode is enabled, you’ll be able to use your computer white RVC records the streaming video in the background.
Maximize your video recording settings (Windows 8/10/11)
Open Settings and maximize your recording frame rates. When recording High Definition videos, full screen games and in general larger video windows, it is important to be able to use higher frame rates and higher video bitrates (see the Quick Guide under Settings/Help for more details on frame rates, window size, CPU).
Begin recording
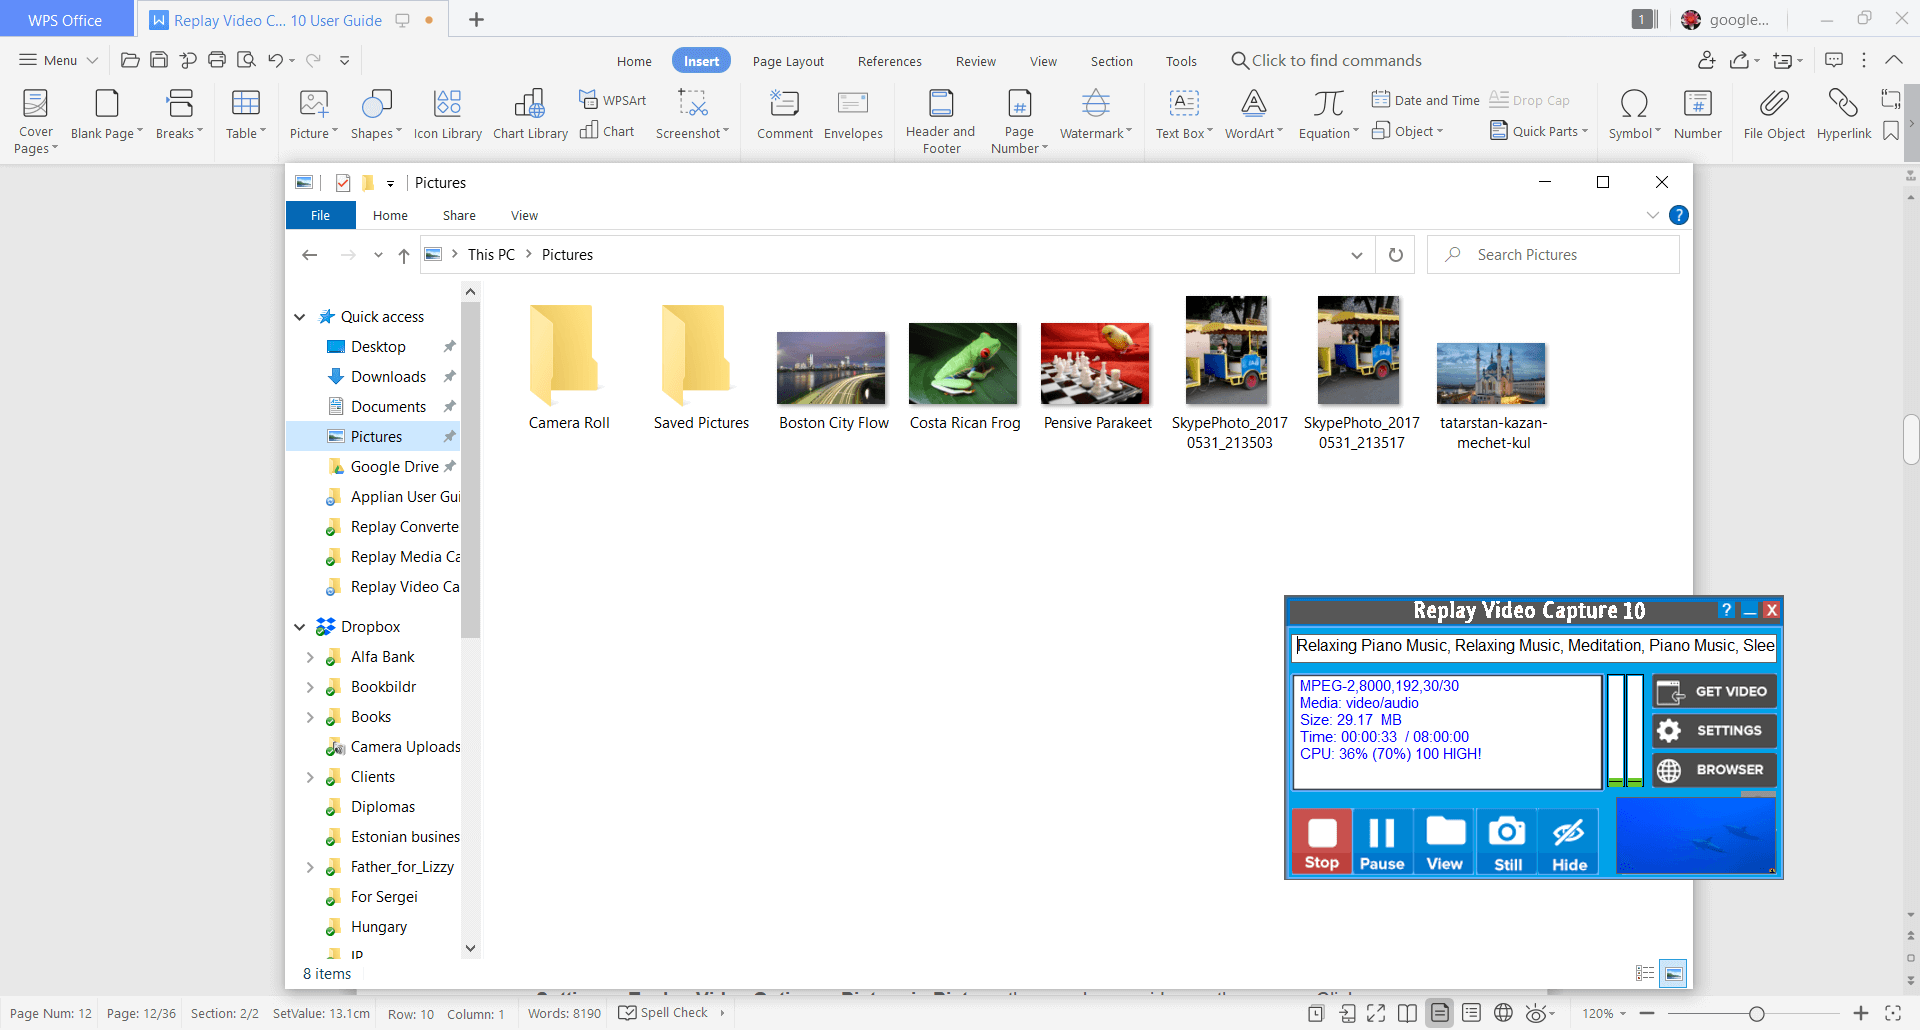
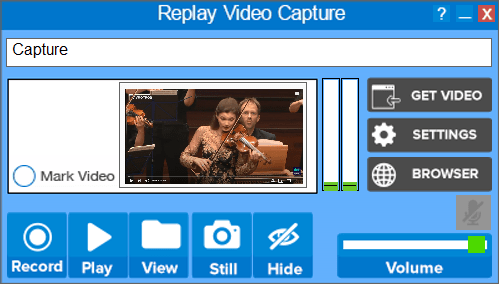
Click the Record button to begin recording. The marked video will be recorded and a small Preview window will appear on Replay Video Capture main screen showing what is actually being recorded. A black, white or a still image in the Preview window means that the Background mode could not be setup and Replay Video Capture failed to record the desired content (see Troubleshooting below).
Picture in Picture
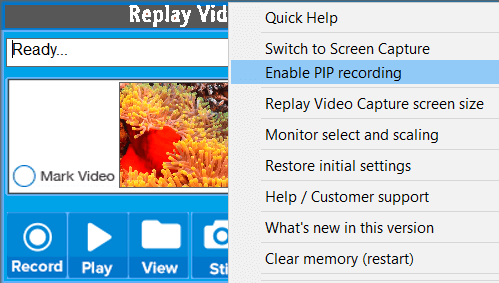
When using the Background mode, you can enable the Picture in Picture option by clicking on the question mark and selecting Enable PIP recording.
Mark the video on the screen, then click on Record. The video will play as Picture in Picture on your desktop.

You can click on the Picture in Picture window to stop the recording and access other options.
Open another browser or program while recording
Click Browser on Replay Video Capture's main screen to open another session of your selected browser or open another program. The marked video you're recording will continue to record even if it's covered by the newly opened windows. Use the Hide / Show buttons to hide or show the recording window.
Note: Newly opened browser tabs in the same browser window will interfere with the recording even in Background Mode, so be careful to always use a new window.
Stop, Playback recording
Same as above.
Tips for using the Background mode:
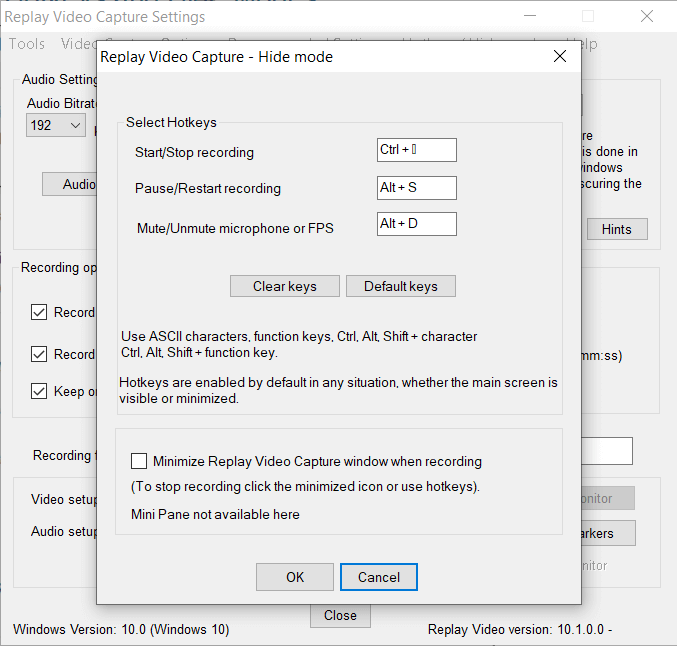
To set up the hotkeys and the hide mode, click Settings / Tools / Hide/Minimize Replay Video Capture when recording or Settings - Hotkeys / Hide Modes in the menu. The default keys are:
Alt + A - start/stop recording
Alt + S - pause/restart recording
Alt + D - mute/unmute microphone (dual audio recording)
Usually, you'd be using hotkeys for recording when Replay Video Capture main screen overlaps the recording area. Keep in mind however that on Windows 7,Vista, XP or when using the Background mode, Replay Video Capture main screen is invisible to recording so you may not need to use hotkeys.
When the Minimize option is selected, recording stops when Replay Video Capture window is restored. You can also use the hotkey to start/stop/pause recording. Note that some browser full screen windows may switch to normal size when minimizing Replay Video Capture window.
In some cases, your monitor resolution or text size may be scaled up (125%, 150%, etc.) HD displays (1920x1080) are automatically scaled up on many Windows 10 computers. In this case, the screen coordinates (mouse coordinates) do not match the actual windows position on the screen. Replay Video Capture will automatically rescale the screen coordinates.
Click on the “?” icon on the main screen to access monitor scaling options.
These settings apply to monitors connected as Extended displays. If your displays are Duplicated you need to provide the scaling factor. Normally the display scaling should always be enabled. You can disable scaling for experiments. Note that when scaling is enabled the display scale shows 100% even if the scale factor is not 100%.
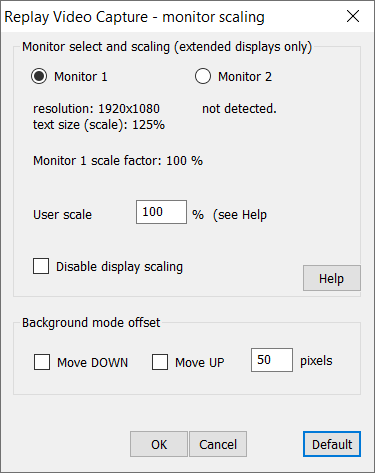
When using the Background mode and monitors with different scaling factors you may need to manually enter a scale factor as a percentage. This can be 70, 80, 125, 150, etc. depending on the resolution of the two monitors. Sometimes the recorded video appears to be moved up or down in relation to the marked area when Background mode was used. Use Move UP/Move Down buttons to move up or down the entire marking window an amount shown in the size box.
For regular PC recordings, there is no setup required. Using the default video format, you'll record videos that can be played back on any Windows / Mac computers or converted to other video formats. If you need to transfer the recorded video to your mobile device, use the MPEG-4 (MP4) recording format or Replay Converter to convert to MP4/iPod/iPhone formats.
Click Settings on Replay Video Capture main screen if you need to fine-tune your video/audio parameters or access other options. In the dialog window, select the option you need.
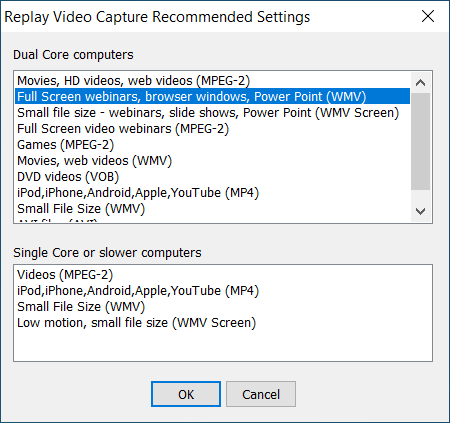
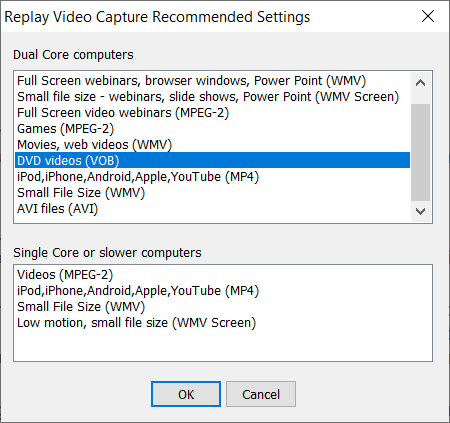
To configure preset video recording settings, click Settings, then choose Recommended Settings. Choose the selection that most closely matches your system:

Video/Audio Settings
To make subsequent changes, just click the Settings button. The Settings dialog will appear.
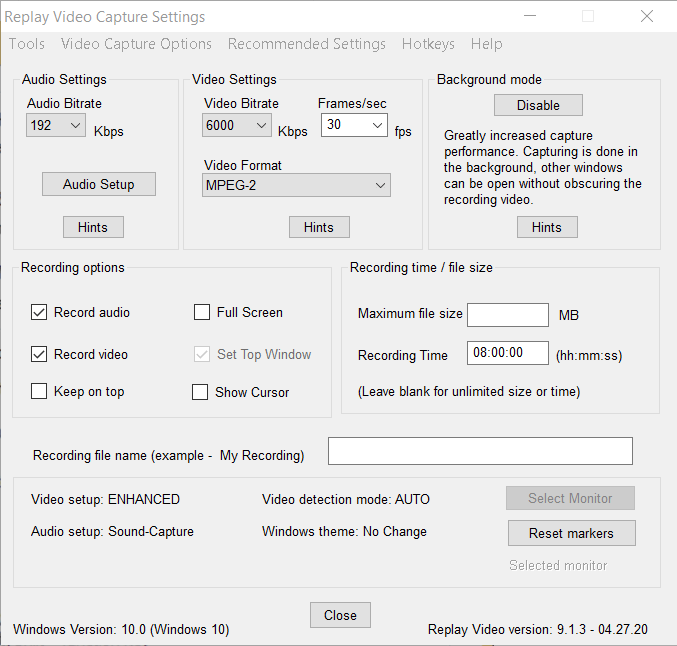
Video or Audio Bitrate (kbps): the higher these numbers, the cleaner and sharper video and better audio quality. However, the file sizes will also become larger.
Frames/sec (fps): the higher this number, the smoother motion quality especially for high motion videos. Note that the number of captured frames per second depends on your computer performance characteristics (speed, memory, etc.) and cannot always be setup to the desired value. In order to achieve high frame rates, use Windows Basic theme on Windows 7 and the Background mode on Windows 8/10. You can select a frame rate from the drop down list or type a number in the Frame/sec box.
Keep on Top: makes Replay Video Capture main screen always on top.
Full screen: marks your full computer screen for Replay Video Capture recordings.
Show cursor: when enabled, the mouse cursor is shown in the recording. This option is great for video tutorials.
Hide when obstructed: enables or disables hiding features.
Video Format: use MPEG-2 for high motion videos (movies), Windows Media or Windows Media Screen for webinars, documents, full screen/low motion video, small size recorded files, MPEG-4 (MP4) for iPhone, iPad, iPod, Android devices or for YouTube submissions.
Video Capture Options
Every time you change the video format, the Video Capture Options window pops up.
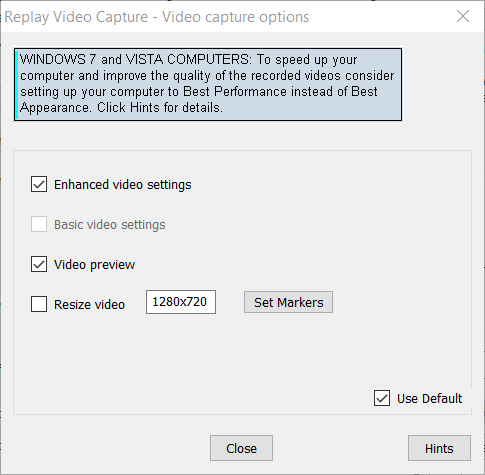
Here are the video options that can be selected there:
Enhanced video settings mode includes enhanced recording features like dual monitor, pause and video preview.
Basic video settings is provided for compatibility with previous versions of Replay Video Capture.
Video preview displays a small video window on Replay Video Capture main screen and shows what is being recorded.
Resize video option can be used to resize the recorded video and is available only with MPEG-2 video format. Please note that not every width/height combination is accepted.
Set Markers option can be used to fix the marked area to a certain width and height.
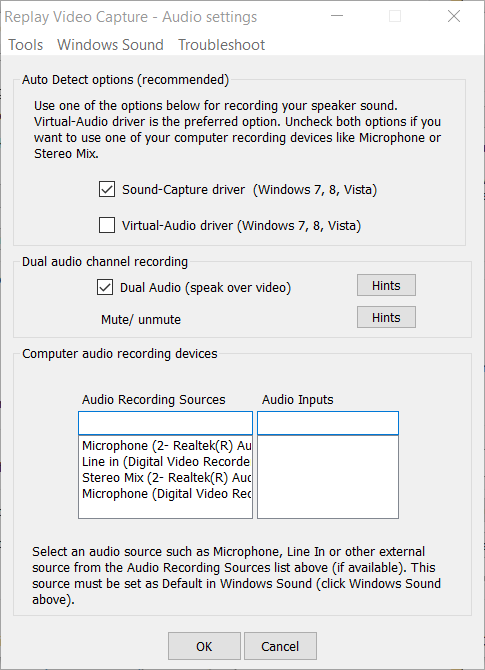
Audio Recording Setup
You can access audio settings from Settings - Audio Setup.
Replay Video Capture will automatically set up audio recording settings when installed. On Windows 7, 8, 10, and Vista, the default audio driver is the Sound-Capture driver (see below). You can also use the Virtual-Audio driver, however the Pause option is not available when this driver is selected.
If you'd like to record audio from the microphone or line in, open the Audio Recording Sources drop-down list and select the audio device you want to use.

Important Note: Replay Video Capture does not support Surround or Quadraphonic sound it can only record stereo. Any available speaker or microphone sample rates can be used with version 10.3 or higher.
For Windows XP: You should use the Stereo Mix recording option if your sound card provides this feature. To find out if Stereo Mix is available, double click (or right-click) the speaker icon on the taskbar and see if the Recording option is listed under Options or Properties. In the Recording dialog, check if the "Stereo Mix", "Wave Out", "What you Hear", "Master Volume" "Rec. Playback" options is available.
The Audio Setup can also find your audio recording sources and setup them up. To do this, open the Audio Recording Sources drop-down list and select one of the audio sources listed. If no audio source is detected, make sure they're not disabled.
Dual Audio Recording
The Dual Audio option can be used to record a second audio source in addition to the speaker sound. In most cases, this will be an internal or external microphone. This feature is only available on Windows 7, 8, 10 and Vista computers.
To enable Dual Audio recording, follow the steps bellow. Your microphone or other external source must be set up as the Default Device in Windows Recording devices (right-click the speaker icon in the task bar, then click Recording Devices or click Replay Video Capture - Tools / Audio recording options - Open Windows Sound to access Windows audio settings). Here is how to set up Dual Audio Recording:
The Mute/Unmute feature can be used to mute/unmute the microphone. Muting the microphone is sometimes necessary in order to avoid the echo feedback between the speakers and the microphone. When enabling this option, a hotkey can be selected to mute/unmute the microphone and a small microphone button is shown on the main screen. In order to enable the mute/unmute option, the microphone should be set as the Default Device. Click Tools / Audio recording options / Open Windows Sound to access Windows audio settings.
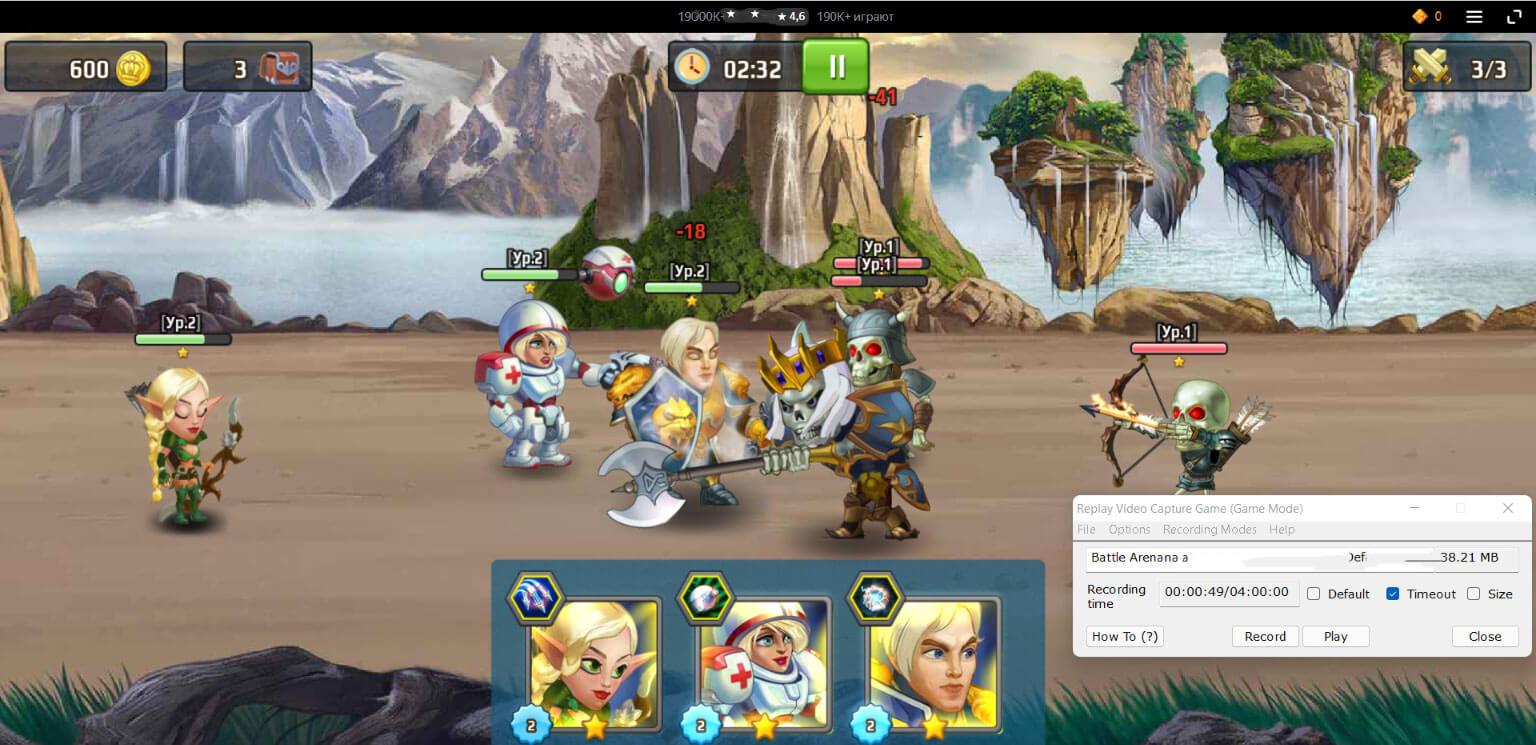
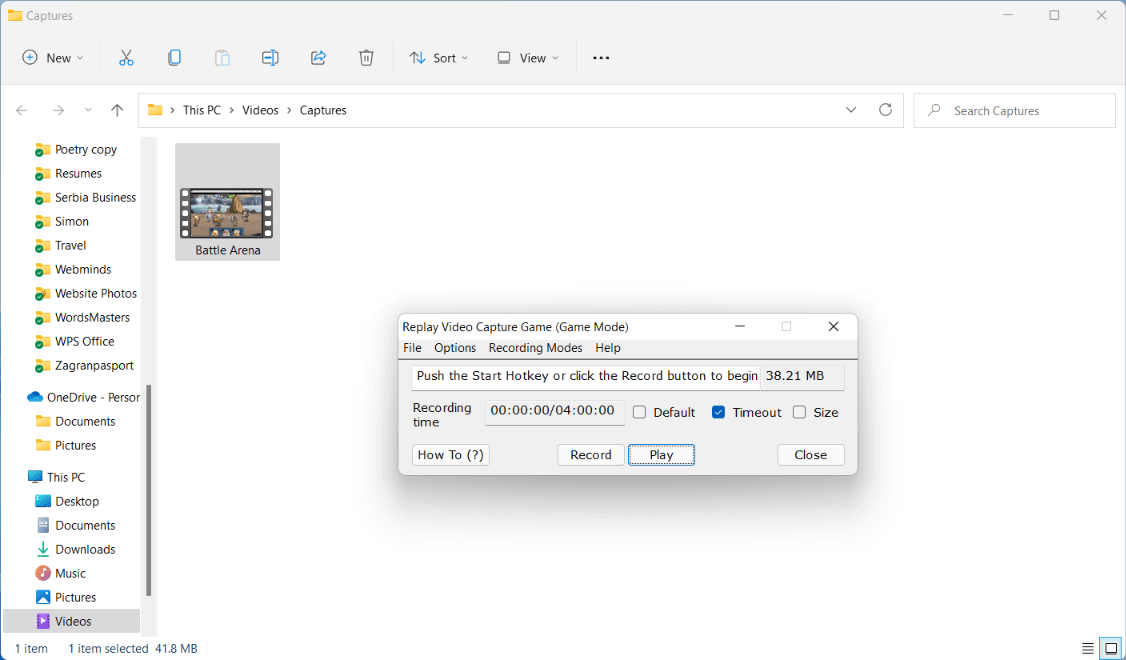
RVC Game adds a powerful recording mode, Windows Game DVR, to Replay Video Capture’s array of tools and settings. This mode records everything: any type of video games, streaming movies, videos, pictures, documents, and provides high-quality recordings without adding any distractions to the recording process.
Just like the Replay Video Capture background mode, the recording window does not need to be visible and you can enjoy recording UHD, HD movies and games at 30 and 60 fps by simply using our handy hotkeys.

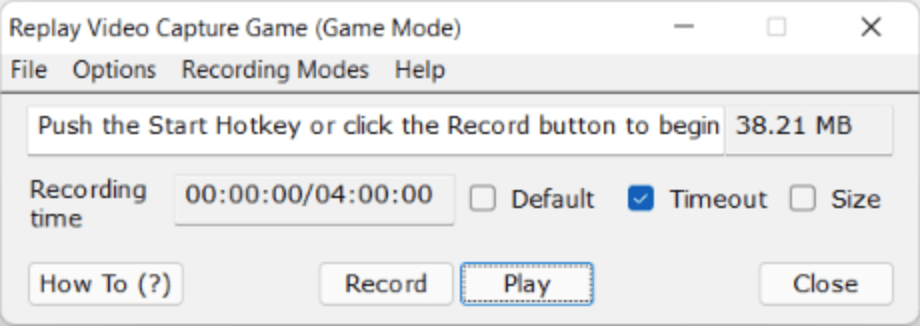
To record a game or a video with RVC Game, you simply need to push the RVC Game Start/Stop hotkey or press the Start/Stop button.
The recording hints below apply to all recording media: games, videos, streaming movies, documents, etc.:
Note: If your Captures folder is on an external drive and the drive is not connected when you turn ON computer Windows may setup a different Captures driver (for example D:\Captures or D:\New folder). RVC Game will not be able to setup the Captures folder. One way to fix this is to restart your computer with your external drive connected. (It appears, sometimes Windows checks the Captures registry entry at startup only).
RVC Game can be used to record games, videos, streaming movies, documents, pictures, etc. However, streaming movies played in the browser with video acceleration enabled cannot be recorded (this seems to be a restriction for screen capturing 4K or other high quality streaming media).
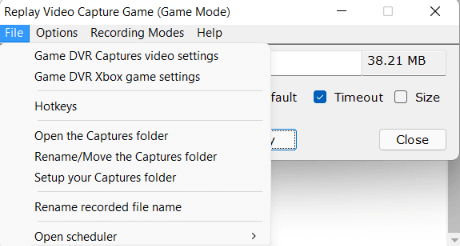
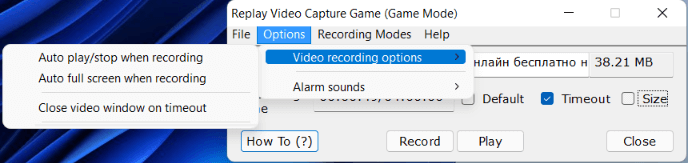
Use these options when recording videos with RVC Game:
You can also schedule recordings using the Scheduler but be aware that you can’t schedule game recordings using the tool.
When you finish recording using the RVC Game recorder, you can check the saved recording by pressing the Play button or navigating to your Captures folder.
The Captures folder is set up automatically, but if you want to change it’s location or tweak some options, follow these steps:
Normally, you should use the Windows Media format to record webinars. In the Recommended Settings dialog select Full Screen Webinars - Browser Windows (WMV).
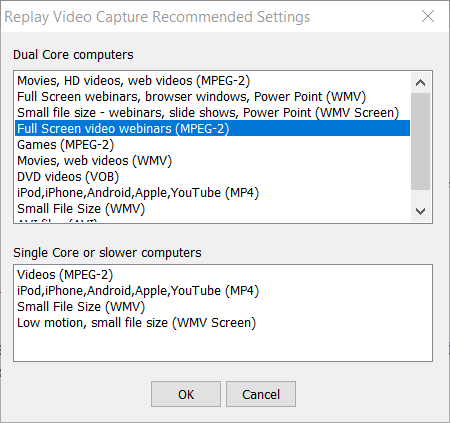
Alternatively, use the Full Screen Video Webinars (MPEG-2) preset.
If the recorded file size is important use Windows Media Screen video format or select Webinars, Slide Shows, Documents (WMV Screen) from the recommended settings.
The recorded file sizes are much smaller when using Windows Media Screen but this video format can only be used for recording low motion videos, slide shows or documents. Browser windows and PowerPoint presentations can also be recorded this way.
Playing or recording UHD (4K) videos depends on your computer performance characteristics. I7, Quad core, 8 GB RAM are the minimum requirements.
Here are some hints for 4K playback and recording:
4K recording (and playing) uses a lot of your RAM memory. It is important to clear this memory when a recording is finished. Replay Video will ask you to manually close the program when a recording is finished. The program will automatically restart after that. This operation is done automatically when using the Scheduler to allow for multiple scheduled recordings.
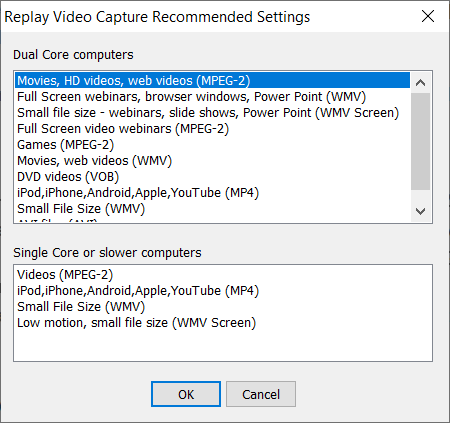
High definition videos (HD) involve display resolutions of 1280×720 pixels (720p) or 1920×1080 pixels (1080i/1080p). Replay Video Capture can record these resolutions provided that your computer has sufficient speed and memory. Usually, a dual-core 2.4 GHz / 4G RAM should be able to handle the 720p requirements. Use MPEG-2 video format (not DVD), 8000 kbps or higher video bitrates, and 192 kbps audio bitrate.
For one hour or more recordings, expect the file sizes to be in excess of 4 GB.
Replay Video Capture can create ISO files, which can be easily burned to DVD using Windows 7,8,10 DVD burning options or any DVD burning program such as Replay Converter. To record a video in DVD format, do the following:
Here are some tips on creating the best quality DVD files:
You need to make sure that your computer can sustain a recording frame rate of at least 29.97 for NTSC, 25 fps for PAL. XP dual-core computers with CPU speed of 1.8 GHz or higher can easily do this. However, on Vista and Windows 7, you should allow Replay Video Capture to set the Windows Basic theme or set up Windows to "Best Performance" mode instead of "Best Appearance" as shown under Video Capture Options.
To check if the DVD frame rate can be sustained, make a short two minute recording, use DVD video format, 6000 kbps, 29.97 fps, 720x480 size.
When recording, Replay Video Capture shows the actual achieved frame rate next to the preset rate in the Status window. Make sure the actual frame rate does not go lower. If that happens consistently, you can still record DVDs but the video quality may not be as good, especially for high motion scenes.
To maintain a reasonable frame rate of at least 20 fps even on slower computers:
To prevent the computer from going to sleep while recording, enable the Keep Alive option in Settings - Tools and select the Keep Alive option.
In the event of a program crash, please check your regular Windows Sleep/Monitor settings.
WM Browser is a reduced version of Internet Explorer. You can use this browser to record videos that cannot be recorded from the Internet Explorer browser window. This situation occurs with some Windows 8/10 versions of the Microsoft browser, especially when the Background mode is used.
To open WM Browser, click Settings - Tools - Browser Selection (for Background mode) - WM Browser.
Google Chrome Canary is a version of the Chrome that can be installed and used for recording. Starting with version 89, March 2021, the regular Google Chrome browser made changes that block screen recording of most movies streamed online. The workaround is to disable the browser's hardware acceleration or use the Chrome Canary browser that does not have these limitations.
You can set up this browser to work in both Screen Capture and Background modes with no need for changing browser settings. You can continue using your regular Chrome browser with no changes for your usual browsing and the Chrome Canary for recording using Picture-in-Picture recording.
Picture in Picture (PIP) is only available when the Background mode is enabled.
Click Settings, Tools, Video options, Picture in Picture, Enable to enable PIP playback. Click Picture in Picture, Record to enable PIP recording.
When you enable the PIP mode, a Detach button is shown on the preview window of the Replay Video Capture's main screen. When you click on this button, the PIP playback window opens. Clicking the PIP video image opens a menu where you can Hide/Show the main recording window, open another window (Browser), minimize the PIP window, or Record.
Audio Options
Google Chrome Canary browser
Setup Storage Folder: Choose the folder on your PC where recorded files are to be saved. ANSI and UNICODE folder and file names are accepted.
Scheduler: Opens the Scheduler. For instructions about using the Scheduler click the Scheduler tab then click Help in the Scheduler dialog.
Hide/Minimize Replay Video: Opens the Hide Mode dialog. This is useful to setup hotkeys and hide modes for recording full-screen videos or games. (see below)
Keep Alive: use this option to prevent computer to go to Sleep or prevent screen savers opening while recording.
Setup video detect mode/Setup Windows theme: Use this option to setup the desktop theme for Windows 7 computers (use Windows Basic theme to increase the performance of your computer). Not available on Windows 8,10.
Video Codecs installed in your computer: you can select a previously installed codec from your computer (not installed by Replay Video). Some of these codecs may not work.
Browser selection for background mode: select a browser or a program that opens when you click the Browse button in Background mode.
Miscellaneous
Install Microsoft redistributable: install Microsoft Visual C++ redistributable 2005, 2010 or 2013. This may be necessary is some of the Direct X components don’t work on a specific Windows configuration.
Run diagnostics (Log File): use this option to reinstall Replay Video DirectX components. The Log file can be email to us.
Disable tooltips: Use this option to disable/enable the tooltips
Disable updates: Use this option to stop Replay Video look for updates.
As of version 8.8, Replay Video Capture is compatible with Windows 2-in-1 devices and will automatically detect when you're in tablet mode. When switching to Slate/Tablet mode, the user interface is increased by 20%. However, this is customizable in the Settings so that you can scale to a larger or smaller size if you wish.
Here's how to use Replay Video Capture in Slate/Tablet mode:
In Settings, click H264-AAC (MP4). The dialog below opens. Click Quick Sync /MP4 or NVENC (NVIDIA) buttons and wait until a message is shown above these buttons. Replay Video will try to record a TEST file using the format specified. A message will let you know if your computer does not support these formats otherwise you should see the message shown in the picture below. Even if the test failed, you could still try to use the selected format.
You can find out if your computer supports Intel Quick Sync from Settings, Tools, Video options, CPU specs.
The Quick Sync format should always be used for recording UHF videos (video window size greater than 1920x1080). The NVENC format does not always work on UHD videos however it has better performance (CPU loading, video quality) on HD or lower size videos. It can record 720 videos at 60 fps with less than 20% CPU loading.
Recording Options
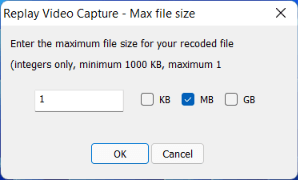
Recording File Size / Time: This lets you limit the time or file size for your recordings. Handy for unattended recordings.
Hotkeys
Important: when using the Windows Basic theme (on Windows 7) or the Background mode Replay Video main screen is invisible to recording. You can see a lot of recording information. There is no reason to hide the Replay Video main screen in this case.
Setting up Hotkeys
Click Settings then click Hotkeys on the upper menu to open the Hotkeys dialog. Here you can setup the hotkeys you like to duplicate the Record, Pause, Mute/Unmute microphone functions. While recording you can use the Mini Pane feature to show the actual achieved frame rate and other information.
Setting up Hide modes
Replay Video main screen can be completely hidden when you check "Hide Replay Video window..." or minimized in the taskbar when you check "Minimize Replay Video window..." . When selecting the Hide mode you can also select a small "Mini Pane" shown on the bottom of the screen while recording. This may be necessary if you want to monitor CPU usage or recording frame rate. To enable/disable this option use Settings, Tools, Video options.
With Replay Video Capture, you can capture a frame on screen as an image file using the Still button. Here's how:
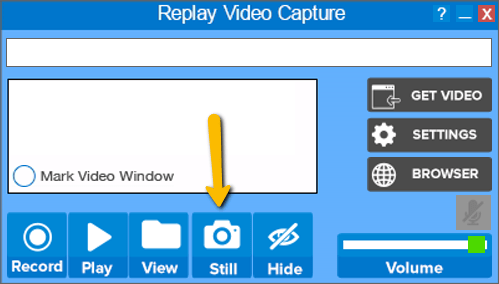
Note: You can also save a screenshot while you are recording.
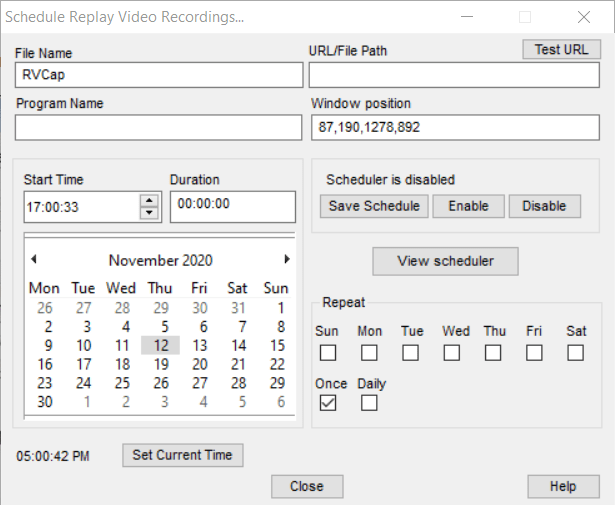
You can make Replay Video Capture open a Web page or a program and start recording automatically at a set time or according to a schedule. Here's how to do it:
Multiple recordings can be scheduled but the recording times cannot overlap.
How to schedule a recording from the browser
If the start time is behind the current time the recording starts immediately.
If a web page address is used (http:// or https://) and the Program Name field is blank, the scheduler opens your default browser.
If you want another program to be opened, you can enter the full path or the Windows name of the program under Program Name. For example Chrome, Firefox or the full path of a program.
Note: If the saved screen coordinates are the coordinates of the recording window, not the entire browser window, don’t change the browser position and size.
Opening the scheduler
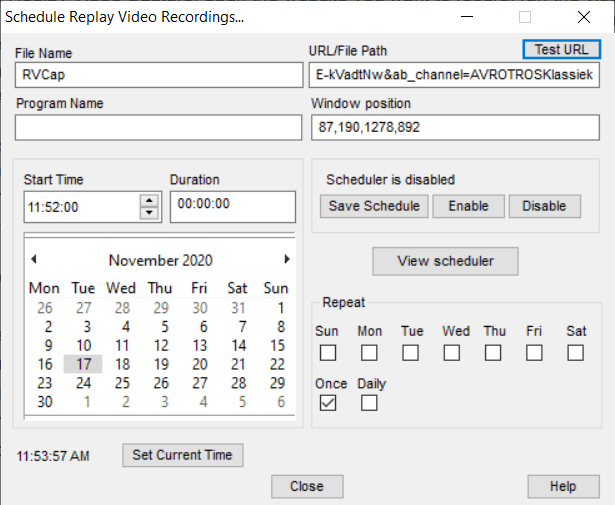
Open Replay Video Capture Settings - Tools and click Scheduler then click Open Now. When the scheduler opens, the file name and the screen coordinates are shown on the scheduler main screen.
Files with the same names are not overwritten. The prefix [1],[2]…will be appended to the filename.
If there are recordings already scheduled when the Scheduler opens but none of them are within the recording time frame (start time > current time < end time) the scheduler enters the “waiting” state waiting for a scheduled recording to trigger. If one of the scheduled recordings is in this range, the scheduler enters the “counting” mode counting the time to finish recording. In this case, Replay Video Capture begins recording until the end time is reached.
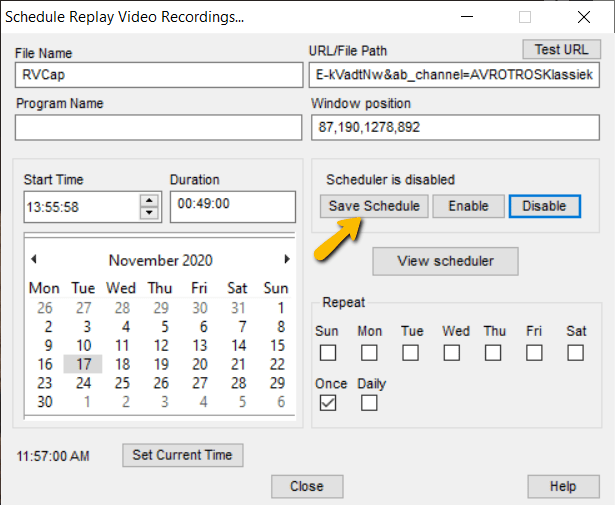
Enabling / disabling the scheduler
The scheduler can be enabled/disabled from Replay Video Capture Settings - Tools - Scheduler.
You can choose to “Open when Replay Video Capture starts”. When this item is checked, Replay Video Capture opens the scheduler at startup and automatically start/stop recording at the scheduled times. If this option is not enabled, Replay Video Capture will not record any scheduled events unless you manually open the Scheduler.
You can also use the Windows Scheduler to open Replay Video Capture if Replay Video Capture is closed.
Scheduling multiple recordings
Multiple recordings can be scheduled however the recordings cannot run simultaneously.
Changing / deleting schedules
Open the Scheduler and click View Schedule.
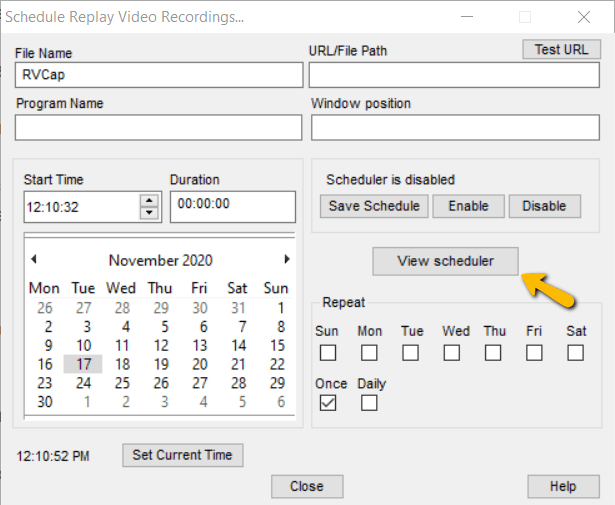
In the dialog window that opens right click a scheduled recording name and select Change or Delete from the pop-up menu.
Using the scheduler file
You can change the file name as you wish. However you must be careful not to change its format. To open the scheduler file, click View scheduler/Open file.
Once you've finished recording, you can see the last recorded video by clicking Play.
To see all your recordings, click the View button. The View screen will appear:
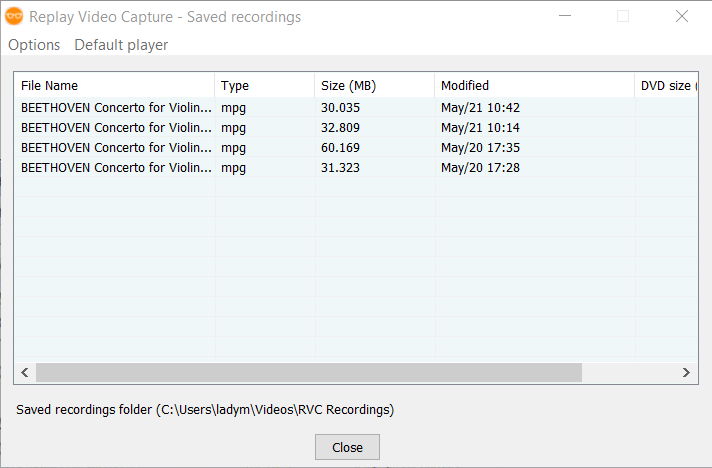
Double-click a file to play it, or right-click on it to play, rename, delete or convert the recording.
You can choose your default player by clicking on the Default player link and selecting the app of your choice to play the videos.
Note: On some systems, you may need to use the supplied MPEG-2 player instead of Windows Media Player or other players that may be set up to play MPEG files in your computers. Right click the file name and select Open MPEG Player in the pop up menu.
The volume of recorded file can be adjusted using the Volume slider. When the Stereo Mix type audio source is used, the recording volumes as well as the audio volume of your computer are adjusted. When audio is recorded using the Sound-Capture option (available for Windows 7,8,10 and Vista), the slider adjusts the recording volume from zero to the computer volume level.
When you enable the Thumb Drive mode, you can record from a USB drive without the need for another installation. To enable the Thumb Drive mode follow the steps below:
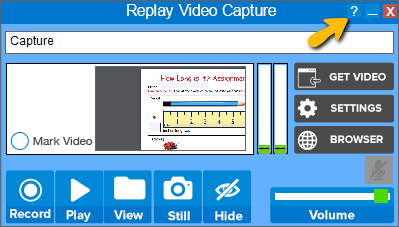
Click the question mark (Help) in the Replay Video Capture window, then click Enable Thumb Drive mode. The external drive installation dialog will open.
Insert your thumb drive and click DRIVES, find the drive, then select it and click Install.
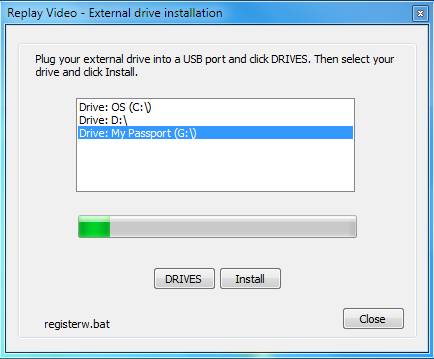
Replay Video Capture will install a folder called “Replay Video Capture” and the shortcut “Replay Video Capture shortcut” on the root of the drive. If your program is registered, the registration code is also installed on the thumb drive.
To run the program, plug the thumb drive into any Windows computer and double-click the “Replay Video Capture shortcut”. The recorded files will be saved in the Replay Video Capture\WMC Recordings folder on your thumb drive.
Note: If you want to record high quality videos, you may need to have a higher speed and higher capacity drive. In this case, it may be better to use external hard drives instead of thumb drives due to their higher speed and storage capacity.
This section describes the Help Menu (“?”) menu.
Quick Guide: here you can access the Replay Video Capture quick start guide.
Switch to Background Mode/Screen Capture: use this option to switch between the Background and Screen Capture modes without having to restart Replay Video Capture.
Monitor Select and Scaling: use this option to select the monitor you want to record from and scale the recording.
Replay Video Capture screen size: adjust RVC’s screen size.
Restore initial settings: restore RVC’s default settings and undo any changes you made to the setup.
Check recording: use this option to configure and record a test recording.
Help / customer support: access the support area on Applian’s website and get in touch with Customer Support.
What’s new in this version: read the release notes for your installed version of RVC.
Enable Thumb Drive Mode: use this option to enable or disable the Thumb Drive mode.
This section is a reference for the Settings dialog:
Recommended Settings: Use this button to automatically configure Audio Settings and Video Settings for the desired type of screen capture, optimal PC characteristics, and desired output quality.
Audio Settings: Set the Audio Bitrate for the recorded audio. In general, 128 Kbps is fine for most recording, but higher bit rates are better, especially when music is involved. Click Audio Setup to manually set the audio driver to be used for recording as well as the dual audio recording (if necessary).
Video Settings: Choose the Video Bit Rate, Frames per second, and Video Format (MPEG-2, MPEG-4 or Windows Media). The Recommended Settings button will do this for you, but you can manually adjust these parameters if you’d like.
Recording Options:
Recording File Size / Time: This lets you limit the time or file size for your recordings. Handy for unattended recordings.
Video Capture Options: Click Video Capture Options from the top menu in Settings to access this.
The Enhanced video mode includes enhanced recording features like dual monitor, pause, video preview.
Basic video is provided for compatibility with previous versions of Replay Video Capture.
Video Preview – when this button is checked, a small video window on the main screen shows what is being recorded.
The Resize video option can be used to resize the recorded video and is available only with MPEG-2 video format. Please note that not every width/height combination is accepted.
The Set Markers option can be used to fix the recording area to a certain width and height.
The Tools menu:
Troubleshooting
If you’re having trouble using Replay Video Capture, follow these troubleshooting tips to fix common problems.
Marked screen region not detected
Marked coordinates are out of the current monitor area. This could be happening when a second monitor is used but is turned off. To fix the problem, disconnect the second monitor, select Monitor #1 in the Settings and reset the screen coordinates (under Settings - Tools - Video options - Reset markers).
Video quality is choppy
To get the best quality video - especially on slower machines - try the following:
I'm having trouble recording audio (see Settings / Help / Audio Troubleshoot). The recorded video is all black or white
This occurs when a media player or a browser uses exclusively GPU (overlay) playback. The now obsolete Internet Explorer may be doing this, in which case you should use a modern browser - Chrome, Firefox, Opera or the WM Browser that’s installed with Replay Video Capture.
If this happens while recording a DVD, use a DVD player that plays DVDs without using hardware acceleration (for example, VLC Media Player with disabled hardware acceleration).
On Windows XP, disabling hardware acceleration should help. Here's how to do it:
I can't play MPEG-2 files created by Replay Video Capture
Some older versions of Windows Media Player cannot playback MPEG-2 files. In this case, use VLC media player or any other modern player.
MPEG-2 video sizes are half the recorded size when played with Windows Media Player
This happens when MPEG-2 files are played with some versions of Windows Media Player. Use a different media player (VLC for example).
I'm not able to play DVD's any more since installing Replay Video Capture (some XP computers).
On XP computers, Replay Video Capture disables video acceleration for Windows Media Player when it’s installed. This is required for capturing the screen section where Windows Media plays the video. Otherwise, the recording will show a black window. This feature can be activated or deactivated in Replay Video Capture's Settings - Video Capture Options by unchecking the “Enhanced video settings” check box.
I get a "Cannot Run Graph” error message
This error can also indicate a failure to set up recording. Some of the reasons this error occurs are listed below.
I get a “Cannot install ... filter” error
This error indicates that the screen capture codec was not installed in your computer. In some rare instances this may be the result of very restrictive security software not allowing ActiveX components in your system. However this problem can also occur on some custom Windows installation (especially Windows 7). Make sure the file regsvr32 located in the folder C:\Windows\SysWOW64 and the regsvr32 file located in C:\Windows\System32 have the same version.
I get “Recording error (x013). Replay Video Capture will close now”
This error indicates that recording could not be started in less than 20 seconds for an unspecified reason. Most of the time this occurrence shows that your system cannot handle the specified frame rate and/or the size of the recorded video window. Lower the frame and/or the size of your video. Also, disconnect the second monitor and use Windows Media video format. Another reason may a marked area that exceeds your monitor resolution.
Audio out of sync
This could happen if the selected frame rate or the video window size are too high.